Category Archives: __4. Shelter Issues

Emergency Tent Living, Part 4 of 4

(Survival Manual/ 4. Shelter Issues/ Emergency Tent Living, Part 4 of 4)
How to live in a tent
tent interiors1

A.  How to Live in a Tent
Part One: It’s Not the Same as Camping
8 Mar 2013, Yahoo! Voices, by Tina Gallagher,  Yahoo! Contributor Network
Pasted from: http://voices.yahoo.com/how-live-tent-12031705.html?cat=7

Why and Where
There are many reasons that a person will decide to live in a tent. In many parts of the world today, people do just that. Some examples include:

  • People in Mongolia and in many parts of the world live in yurts, which is a circular type of tent with a solid front door.
  • Military troops on deployment to different areas will live in tents.
  • Refugees fleeing economic, political, natural disasters or other circumstances live in tents.
  • Those attending week-long outdoor festivals such as “Burning Man,” will live in tents.
  • People on retreats and sabbaticals will live in tents.
  • Those building houses in wilderness areas may live in tents during the construction process.
  • Homeless people may live in a tent if they are available.

I have lived successfully for weeks in a 7-by-7 foot, four-foot tall tent. I had permission to live on the land where I pitched it. Always make sure the landowner is okay with you being there. Trespassing is against the law; you could go to jail.

My choice of tent was basically made by my finances. You can choose the tent you need.
You will be surprised, as I was to find out how much “stuff” you really do not need.

To begin my sabbatical, I obtained permission to camp on a stretch of land. I will not give the exact location. I do not have the landowner’s permission to do so.

I chose the date that I would begin and took everything I owned to the place. It was nearby several businesses; the employees could not see my camp. I was not far from a public library. This would become very important during the sabbatical. Approximately a quarter mile from the library was a grocery store. I could buy what I needed.

The beginning of my sabbatical was in January 2013. Choosing the middle of the winter wasn’t all that dumb. The weather here can vary from mild to harsh. I was prepared for almost everything.

I pitched my tent and clipped my cat’s leash to one of the tent poles. She could run around in her harness in a 10-foot diameter. She loved it.

Since space was limited inside the tent, I had to choose what to put in it carefully. Here is a list of the various items:

  • A single-wide air mattress. I blew this up with my mouth. No, it wasn’t easy, but it can be done with patience.
  • A sleeping bag, blankets, comforter and pillow.
  • My cat’s carrier, water and food dishes along with a small broom and dustpan and her litter scooper.
  • My backpack which was filled with different things.
  • A bag containing toiletries and necessities.
  • My clock

A second tent was given to me, but I decided it was too tall (six-feet). I also discovered the door’s zipper was broken. I pitched it, staked down the corners and placed the rest of my belongings inside. I weighed down the rain cover with rocks. It worked fine.

Now I was set to begin my sabbatical. I learned several things about myself and the world around me.

The second article will discuss water, cooking, shopping and living without refrigeration.

Source: The author of this article has over 40 years of experience in diverse subjects and skills such as DIY, home improvement and repair, crafting, designing, and building furniture, outdoor projects, RV’ing and more.

.

B.  How to Maintain a Campground
4 Apr 2013, Yahoo! Voices, by Tina Gallagher, Yahoo! Contributor Network
Pasted from: http://voices.yahoo.com/how-maintain-campground-12048160.html?cat=7

When I decided to live in a tent, I also decided to share what I knew and what I learned along the way. Those who live in a tent should always obtain permission from the landowner before attempting it. If you own the land, you can camp on it if your local ordinance or state law permits it.

This is the third article in the series, “Living In A Tent.” This article will discuss:

  • Maintaining the camp
  • Personal hygiene
  • Pet hygiene
  • Wild Animals

Maintaining The Camp
There are a number of ways to maintain your camp. The best is to follow eco-friendly practices. The following tips will help your camp stay pristine so that you do not cause any damage to your surrounding environment.

  • Remove all of your trash daily and place it in a proper receptacle.
  • Never leave a fire to burn itself out. This ludicrous practice has been responsible for numerous campfires over the years. If a fire starts, your tent and belongings will go with it.
  • Choose a place to dump out wash water; always use bio-degradable soap for baths, hair-washing and dishwashing.
  • Remember the old adage: “You pack it in, pack it out.” It should be self-explanatory.

Personal Hygiene
Staying clean can seem like a major issue when you live in a tent. If you have a gym membership, a friend’s house you can visit regularly, have a shower at work or school, you pretty much have it made. If not, it’s really not that hard.

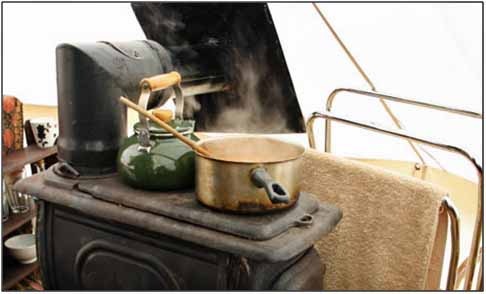
Heat water in one of your pans. My Sterno stove does just fine heating a quart of water in a blue enamel saucepot. Pour that into a clean bucket and add a little liquid soap and your washcloth. Add just enough cold water to make it the temperature you like. Swish around a little, and wash inside the tent, wringing out the cloth before washing. Frequently dip the cloth into the soapy water and squeeze it out. You can have a separate bucket with warm water and a clean cloth for rinsing, but I’ve found this unnecessary.

For washing hair, heat water and pour into another bucket. Lean over and use a cup to get your hair wet. Your goal is to clean your scalp. Use just enough shampoo to get your hair clean, dipping the cup into the water and pouring it slowly over your head while you wash. It takes a little practice. You won’t have a head full of lather unless you want to pour water over your head for quite a while to rinse. You can use a 2-in-1 shampoo/conditioner or use a leave-in conditioner.

For ladies, we have to deal with feminine napkins every month. Do not bury these or toilet paper anywhere on the camp ground. Place these items in a trash bag and take it out of the camp daily.

If you do not have a toilet, a porta-potty is a great answer. Do not dig a latrine in the campground. There is a porta-potty that uses bags called “doody bags.” You do your business in the bag, close the bag and dispose of it in the trash. It contains gel to take care of liquid and solid waste.

If you have leftover food after cooking, put it in a plastic bag and into the trash. Do not dump it on the ground; you will have to deal with bugs and wild animals if any are around.

Pet Hygiene
If you have a dog in your camp, prepare to “scoop the poop.” Do not allow your pet to mess anywhere just because you are camping. You will have to deal with flies, stink and bugs. The landowner or campground will ask you to leave. Clean up after your pet.
If you have a cat, the same advice goes. Use a box with cat litter and scoop the waste into the trash bag.

Wild Animals
If the land you are camping or living on has no wild animals, don’t worry about this. Of course, anywhere near a residential or urban area you could be dealing with stray domestic animals. There are a few rules to follow for the safety of your camp, yourself and your pet(s):

  • · Do not leave human or animal food out overnight.
  • · Keep all food in a container that cannot be opened by an animal- a Sterlite storage container with the lid locked in place will do.
  • · Although this has been mentioned before, do not pour food bits out around the camp. This attracts pests and animals as well. Raccoons are not “friendly Disney creatures,” they are incredibly dangerous.
  • · Ensure your pets have their vaccinations up to date.
  • · Do not attempt to track, pet or feed wild animals.
  • · Do not allow your pets to run free or to chase anything.

It is not hard to maintain a clean camp, keep yourself and your pet safe and clean. It does take effort; after a few days it will become a habit.

tent eureka copper canyon collage


C.  Frugality, Making a Living and Living Without Electricity in a Tent
18 Mar 2013, Yahoo! Voices,  by Tina Gallagher, Yahoo! Contributor Network
Pasted from: http://voices.yahoo.com/frugality-making-living-living-without-electricity-12049380.html?cat=7

I decided to live in a tent during 2013. I learned a lot about living without different luxuries and things we often take for granted. It is a truly different way of life. I will share what I learned with you. Before you begin, make sure you have the permission of the campground or landowner.

Frugal Living
It is not expensive to live in a tent. If you have a pet or other belongings with you, you will soon discover what you can and cannot live without. You do not need refrigeration for some foods such as peanut butter, honey, most condiments and fresh vegetables. If you have limited space, you can shop for what you need for the day or the week. If you do not have an ice chest which requires frequent additions of ice, you can still have healthy meals.

Condiments, peanut butter and honey as well as other foods do not need refrigeration. Only use clean utensils to scoop out such items as relish or mustard.

Purchase meat in cans; it will keep for several months. It must be used within a couple of hours of being opened. Fresh meat should be cooked and eaten within a couple of hours. Only cook what you will eat; leftovers will not keep and waste will cost you too much money over time.

Earning A Living
Some people who live in a tent go to regular jobs during the day and return to their campground in the evening. Others make handcrafts that need storage space until they are sold.

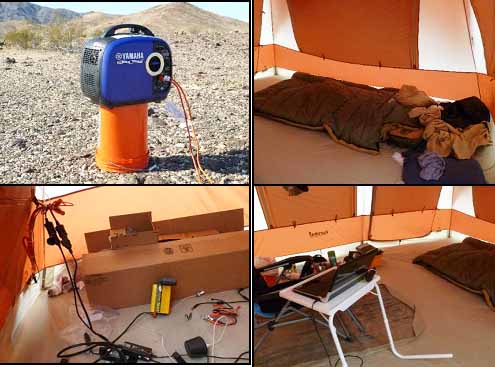
I make a living as a freelance writer. I had no electricity in the camp, so I put my laptop in my backpack and carried it to the local public library every day and worked. The library allows customers to use their wi fi without any time limits. Before I had the laptop, I worked on the library’s computers; they have a two-hour time limit every day. I saved the money and ordered it; friends allowed me to use their address and they accepted it for me.

Living Without Electricity
Noting some of the panic in my neighborhood after hurricane Hermine, my neighbors and I tried to educate children about living without electricity. It is not as hard as it sounds; millions of people around the world do it every day.

The first feeling is one of a mild panic; at sunset the sky and everything turns dark. The first few nights I used a battery-powered lantern. After a few nights, my eyes learned to focus with the available moonlight to move around at night. Of course, with some of my wild neighbors such as raccoons and skunks, I did not go far from my immediate area. The ground was also very uneven; staying on familiar footing was also safer.

I used the laptop at the camp every night until the battery went low. I noticed quickly that in colder temperatures the battery would drain faster. I simply used the time I had to work or watch an entertaining program.

It should be noted that entertainment is a necessary part of a human being’s life. While I did not go out to movies or restaurants during this time, I still watched favorite television shows on HULU.com and other sites.

tent solar panels


D.  Make Your Next Camping Trip a Solar Experience
Let the Sun Power Your Camping Gear
22 Feb 2013, Yahoo! Voices,  by Tina Gallagher, Yahoo! Contributor Network
Pasted from: http://voices.yahoo.com/make-next-camping-trip-solar-experience-12016869.html

I love camping. I hate to carry charcoal, firewood and batteries. Many campgrounds are not allowing people to bring in firewood anymore because the practice spreads diseased wood and bugs that are detrimental to the forests. When a burn ban is enacted, barbeque pits with charcoal are sometimes not allowed either.

So, what am I supposed to do? Sit in my camp eating cold beans and franks?

I won’t. With today’s technology, I am collecting new items for my camping gear. The sun will power my camp, cook my food, heat my water and provide a hot shower. I don’t have to run a generator or carry fuel.

All of these items can be found online and in various big box stores. Shop around to find the brand you like the best and obtain the best price.

They will also make a great addition to your disaster preparedness supplies or bug-out kit.

Hot Water
To have hot water for showers, you can buy solar showers in five or 10-gallon bags, either with or without spray nozzles. You can make your own pressurized solar shower as well. [See: http://voices.yahoo.com/diy-own-pressurized-solar-shower-11151012.html?cat=16%5D

To have hot water for drinking, washing dishes or cooking, you can heat water over a stove, in a solar oven or by setting a glass jar painted black in the sun.
If you take your car, there are 12 volt water heaters that plug into your cigarette lighter outlet. [Search, “12 volt water heaters” at Amazon.com]

Security Lighting
In a campground, you might not think about having a small sized solar powered security light. It may bother other campers. Then again, it could discourage a bad person from entering your camp and taking something. Lights suddenly coming on could scare off animals that could cause harm to you or your gear. A wide variety of designs are available; they could mount on a PVC pole that can be included in regular camping gear. [Search, “solar security light” at Amazon.com]
While they are not standard equipment on an RV or car, having them attached could also help you see if you have to step outside at night.

Solar Battery Charger
Some things just have to have batteries or to be charged. IPods, cell phones, laptops (for entertainment, of course) need power to operate. For standard batteries, there are several models for using the sun to charge regular batteries. Some models also charge cell phones. [Search “Solar battery charger” at Amazon.com]

For a laptop, more power is needed to charge the batteries. I carry a spare battery for my laptop in case I can’t get to a place I can plug the charger in. While the first battery is charging, I can use the 2nd. This solar panel will charge the laptop battery while I’m fishing, hiking or just having fun. Search, “ SUNPACK 16W Portable / Foldable Solar Charger for Laptops” at Amazon.com.

Solar Cooker
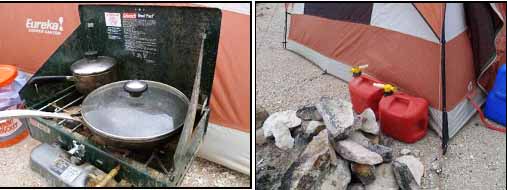
Solar cookers abound on the market. You can also make your own; many different designs are listed online. It depends on what you will be cooking, the size of cooker you want to carry and the size/type of pans you will use. Your home made model can be any size you wish. Currently, I use a Sterno stove and a single qt.-sized enamel pan for cooking in my camp. My solar oven won’t be very big at all. [See Global Sun Oven at: http://www.sunoven.com/   This is my personal favorite. Mr. Larry]

Solar Lantern
If the moon isn’t out, I need to see where I’m going at night. A solar lantern will light my way. Each model on the market has different charging/lighting times and may provide light for a specific amount of time. I’ll carry two. If one dies down, the other will work fine. I think I’ll find a model that uses both solar and batteries. With rechargeable batteries, I won’t run out of lighting.

Solar Radio
Several companies offer radios that have solar charging panels, use battery power, AC power or can be charged by turning a hand crank. This will not only provide entertainment, but could come in useful in an emergency.

There are models that can charge a cell phone, have flashlights or emergency flashing lights, sirens and more. There is a model for everyone.

Solar Flashlight
If I want to go outside without waking everybody up, I can use a solar powered flashlight. I can carry one in the car, have one in the house and anywhere I need one. It can sit in a place where the sun can charge it. In an emergency, or when I need a flashlight, I’m not looking for batteries or wishing the store was open.  [Search “solar powered flashlight” and “solar powered lantern” at Amazon.com]

My new camping gear won’t take up a lot of space. With the sun powering everything, I won’t need to carry batteries, fuel or haul a generator everywhere. My travel trailer will be a little lighter, which means I save on fuel. My backpack will be lighter as well- yippee!

tent battery bank

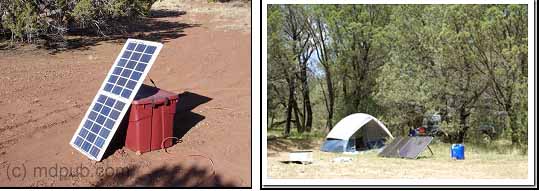
[Above Left: Steve Harris Emergency Home Battery Bank. See,  www.Battery1234.com This demonstration photograph shows the type of small appliances- personal electronics that can be powered by a deep cycle battery with an inverter.
Above right Mr. Larry’s “mobile power unit” shows a 125Ahr (70 lb battery) and outlets mounted on 2 wheel luggage dolly. Power is taken from the battery in bottom box, fed up to the inverter and 12 volt receptacles in the top box. An orange extension cord runs electric power to an appliance at a “remote” location. This is a very simple “plug and play” electrical system, no special electrical knowledge is necessary. The deep cycle battery is set in a Minn Kota Power Center  (bottom box); the top battery box houses a 4-way 12volt receptacle and a 400 watt inverter with USB,  also providing area for extension cord storage. A very simple system.]

..
E.  The Gear You Need for a Completely Solar Powered Camping Trip
27 June 2011, Yahoo! Voices, by Mrs. Renee, Yahoo! Contributor Network
Excerpts pasted from: http://voices.yahoo.com/the-gear-completely-solar-powered-camping-8688841.html?cat=11

When it comes to camping there are many different ways that you can go about planning out your trip. If you are looking to really benefit from all that nature has to offer then you may want to consider camping with solar power. Solar power also comes in handy when you are at a campsite that does not offer electricity. One of the best ways to add solar power to your next camping trip is to get the right kids of gear. The first step to planning your solar powered camping trip is to stock up on solar powered camping supplies. Once you have all of the solar powered supplies you can then put them to good use. Below are some of the tp solar powered items to add to your camping shopping list.

Solar powered flashlights
Having solar powered flashlights, can really help when it comes to saving money on batteries for flashlights. A solar powered flashlight that comes with a back up batter will make sure that you stay charged through out the day. What is great about these lights is that they do not require direct sunlight to charge. So you can let them charge during the day, and then get them when you need them at night.

5 Gallon Solar Shower
Even though it may say solar shower, this is perfect for cleaning dishes as well as using as a shower. Or you can just rinse off the kids hands when you need to. Just leave the bag in the sun and it will warm itself up. When you are ready to shower you will get at least five nice short showers out of the bag. You can just get a tent that is made especially for showers, and use this bag with it. You can find these items at most Wal-Mart’s. [Search, “Camp showers” at Amazon.com]

Soul Cell Solar Powered Lantern
Having a solar powered light to brighten up the nights is really what you need on a camping trip. You don’t have to worry about bringing along tons of batteries for an extended camping trip. With less to carry this item is really a must have. Search Google for, “Barefoot Power Firefly 12mobile Super Bright LED Lamp”, or comparable models]

Cordless Bug Zapper
The cordless bug zapper just needs to sit in the sun to be recharged. There are mosquito bug zappers, or the all in one bug zapper. Do a simple search on Google and you are sure to turn up plenty of options. Just allow the bug zapper to charge during the day, and let it rest at night. Search Amazon.com for: (mosquito control) “INADAYS InaTrap Electronic Insect Killer and Elegant Night Light” or (fly control) “Fly Web Glue Board 10 Pack”.
.

F.  How to Maintain Your Safety in a Campground
Part Five in the Series, “Living in a Tent”
5 Apr 2013 , Yahoo! Voices,  by Tina Gallagher, Yahoo! Contributor Network
Pasted from: http://voices.yahoo.com/how-maintain-safety-campground-12070185.html?cat=4

I camped on a friend’s property in 2013 as a sabbatical. I had permission to be on the property, but my location was near a busy highway and two very busy roads. I was concerned for my personal safety not only during the day, but at night when I slept. When I left the camp every day to go to the library to work, I was concerned for my campground, my cat and my belongings.
Maintaining your safety is not a difficult task if you follow some tips.

Step One: Noise
If you make a lot of noise with a CD player, TV, DVD player or musical instruments, you will likely be heard by people passing by. Since a tent has no lock on the door, a nefarious person may begin to watch the area to find out when you leave. On large pieces of land, the owner may not have the ability to keep an eye on you or your tent all the time.

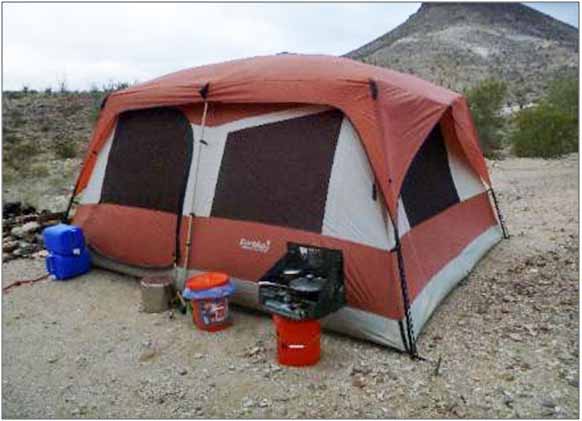
Choose your campground wisely; walk beside the property to see if you can spot your campground from the road. If you can, move it to a more secure area. The taller and more brightly colored your tent is, the more chance you have of being spotted. Shorter and smaller is better.

To eliminate noise, do not bring musical instruments with you. Use headphones for electronic devices. You might not sleep well the first few nights because of unfamiliar noises. You will get used to hearing the sounds of the area around you and will sleep through the night eventually.

Step Two: Light
I seldom turned on my battery operated lantern at night. I became accustomed to using the available moonlight to move around my camp. After the roads died down and the businesses in the area closed for the evening, I might turn on my laptop and watch a show for a little while. I had the screen turned away from the road and used earphones.

Needless to say, I did not go exploring in the area at night. In rural Texas, that’s not a good idea. Critters come out at night; not all of them are friendly and a few have no sense of humor about being stepped on by clumsy humans who can’t see in the dark.

I never started a campfire; the smoke and flames would attract attention in the area because a burn ban was in effect. My little Sterno stove flame could not be seen from the road; I had hot coffee, food and bath water every day.

Step Three: Protection
If you believe in the power of prayer as I do, pray for your campground’s safety every day.

I also had a 15-inch long Maglight in my tent as well as a piece of rebar for self-defense. The heavy metal flashlight can readjust someone’s attitude. Of course, the best protection is non-detection. I did see trespassers on my friend’s property one night; they came near my campground in the night. I was terrified. They came to a point on the trail that dropped off sharply and would have caused them to crash if they had continued; subsequently they turned around and went away. I informed my friend about them; she watched the area as well. Her hired help caught up with them and I did not see them again.
A cell phone can be a lifesaver; practice ahead of time to let the police know where you are and how to find you quickly.

Step Four: Travel Carefully
If you walk or drive to your campground, do not take the same path every day. Most people do not notice a car or truck turning off the road. If you walk, do not call attention to yourself. I was leaving from an area that did not have a house or road close by; most people on the road took no notice of me.

When I returned to my camp every day, it was a little after dusk, just as the light was leaving the sky and the night was turning dark. I was never followed. People on the busy street were more concerned about getting to their homes than paying attention to someone walking beside the road.

Step Five: Be Careful Who You Talk To
Do not walk around telling everyone you know what you are doing. A well-meaning friend or someone who overhears you could call the police, the health department or other authorities. Although I had permission to be on my friend’s property, someone could have made trouble for her and me because I was living in a tent.

Living in a tent can be a rewarding, relaxing experience. Taking care of your security is a daily task that takes a little effort in the beginning; you will develop the habit quickly.

[Note:  Consider “Household Alert” motion detecting alarms or other light/alarms installed inside/outside the tents greatly enhances security. Plug the  four way control unit into your inverter. The “Household Alert” remotes  each run and transmit off two AA rechargeable batteries. My home motion detection alarm batteries need  recharging about every two months. Mr. Larry]

tent interiors2

.
G.  Extended Tent Camping
Considering Life on the Road in a Tent
26 Jul 2010, Yahoo! Voices, by Carrie Hetu, Yahoo! Contributor Network
Pasted from: http://voices.yahoo.com/extended-tent-camping-6433286.html?cat=7

While it may not be highly popular and certainly not highly publicized, there are those who choose a lifestyle involving extending tent camping. Basically a choice to live in some type of tent while either traveling or staying put in the tent on somebody’s land for an extended period of time. For some, it may be more of a forced option after foreclosure, eviction or job loss. Yet for others it is very much a conscious choice for whatever personal reasons they may have such as a desire for sustainable living or simply the pleasure of traveling and life on the road. Whatever the case is, there are several things to consider, especially if it will involve full time traveling.

Choice of tents will be something to devote a lot of thought on as most nylon tents are really not made to be living in and lack durability. Reinforcing the seams may help aide in a longer lasting tent. The attraction to nylon tents is that they are quite reasonable in price. They are also fairly easy and quick to set up. Rain tarps will also help tremendously in keeping the tent, you and your belongings dry in rainy weather. Of course size is always a consideration as well for it must be able to comfortably sleep the number of people who will be staying in it.

Canvas Wall tents while pricey may be the best choice if you can readily afford them. They are roomy, can have a wood stove fitting on them, extra ventilation windows and were made more durable for miners and hunting campers that typically stayed for lengthy periods of times in them. Of course you will also then have the added expense of purchasing a wood stove, as when traveling you are never sure if you may get caught on a few wintery or just plain cold nights.

If you have a car, then most likely you will need to purchase a pull behind trailer to store all your belongings, especially if you have several people in your group or family who will be coming. These typically can run from $300 to $700 for a good used one and again durability is a big consideration in purchasing one. An all metal one would most likely be your best option here as wooden ones can fall apart and will not last near as long. The length you would need would depend on how much you really need to take with you, depending on the number of people that will be with you. Make sure your vehicle will easily be able to haul it without due stress on the engine when going up and down really steep inclines. If you have a suitable Truck, a trailer may not be necessary then.

Of course money always must be a top consideration as money makes the world go round and you will need some. You will have to figure out how much you will need a month to cover camping fees, although there are places you can camp for free, you will most likely want some paid camping sites that offer showers, water and other amenities. You will need to consider how much you will need for gas, food, car insurance and perhaps other things like cell phone and mail service. On a low side it may run a family around $600 a month yet on a high side perhaps around $1500 depending on the quality of life you are looking for and the things you typically like to spend money on.

Once you get an idea of how much you need a month, then you need to figure out how you plan on acquiring this money to supply your needs. Will it come from money you have saved or will have once you sell everything off if you plan on giving up your residency for life on the road? Will you work along the way or have work you can do on a computer from anywhere? Do you plan on having an emergency fund to cover auto repairs or to get another place to live if you find you do not like life on the road? This may be a wise thing to have in place before you plan on embarking on your journey!

If you plan on giving up your residency then downsizing will have to be considered as it will be a MAJOR downsizing undertaking. You will need to sell everything you do not absolutely have to have, sticking to the items you will have to take with you in order to cover your basic needs. This can cause a sense of stress for those who are attached to material possessions yet can be a liberating experience to cross over to sheer simplicity.

4 seasons must be considered when purchasing the things you will need on the road. While you can tend to follow weather when traveling, you cannot always guarantee you will be in pleasant, dry weather. Weather is unpredictable and yet your lack of knowledge of certain areas may catch you in less than desirable weather as well. It is best to be prepared for any weather conditions and purchase items and pack accordingly. It would not be much fun to be in a tent in negative zero weather, with no heat and only short sleeve shirts, not to mention that would be a tad dangerous!

Dreams and ideas must be considered as well as they rarely live up to what our mind holds in conjunction with reality. Expect the unexpected and really try to look at the reality aspects of things that could happen. Lengthy rain periods may have you dealing with mold, lack of jobs may leave you financially strapped, broken down vehicles are never a pleasant experience. Wildlife may rampage your food supplies if you are careless or even try to enter and tear up your tent. It will not always be that romanticized image of a perfect life you may see in your mind. Be prepared for the worst but expect the best may be totally appropriate for this endeavor.

Besides a tent, consider what other equipment needs you may have such as an actual spare tire on a rim and full of air rather than just a doughnut. Other things you may need, want or should consider yet not a complete list would be:

  • First aid kit
  • Sleeping gear
  • Coleman stove
  • Cast iron cookware for cooking on open fire
  • Flint and steel for starting fires in wet weather when matches or lighters would not work
  • 5 gallon bucket with a loo cover for a toilet
  • Solar shower
  • Water jugs to fill with water before going to some free camping areas where water is not available
  • Fishing gear
  • Axe and shovel
  • Flash lights
  • Solar weather radio with cell phone charger
  • GPS system or atlases
  • Emergency glow sticks and flares
  • Extra tarp covers
  • Clothing for all weather types
  • Hiking boots
  • Basic tools such as a hammer, saw, wrenches and screw drivers
  • Lap top computer if you can work from computer for pay
  • Batter cables for car
  • Jack for car
  • Cooler for cold food storage
  • Emergency food bar packs
  • Emergency thermal blankets
  • Pocket knives
  • Tent fans
  • Tent heater or wood stove depending on type of tent you purchase
  • Silicone seam sealer

While extended tent camping may not be for everyone, for those who are considering it, hopefully this will aide you in making some wise choices to get you off to a good start! Have fun and be prepared!
.

H.  Would You Live in a Campground?
5 Nov 2007, Yahoo! Voices, by Carmella Mae Dunkin, Yahoo! Contributor Network
Pasted from: http://voices.yahoo.com/would-live-campground-638794.html?cat=16

If you wouldn’t live in a campground, why wouldn’t you? I know up until a year or so ago, I could not picture myself living in a campground, but now I see it, and I’m doing it, along with my husband and kids.

When you think about living in a campground, you probably think of a tent, no bathrooms, no showers, at this time of year it is cold at night, so you think of staying warm. The reality of it though is this, people who live in campgrounds, (yes people really do live full time in campgrounds), live either in an RV, a trailer, or a cabin. There are probably almost as many Americans living in campgrounds as there are living in “houses”!  [In some parts of the country, during the winter in : FL, TX, NM, AZ, CA. and during the summer, across the northern tier of states. Mr. Larry]

Despite popular belief that camping means pitching a tent and “roughing it”, many campers now days, (AKA RV’ers), live year round in campgrounds across the Country in their RV’s, 5th wheels, and travel trailers. In fact, full time RV’ing has become quite a trend, and many families are now selling their homes, storing their belongings, and taking to the road and living full time in their RV’s. A lot of these families are even working on the road. Many work in campgrounds in exchange for space rental and a little cash. Most campground jobs require 20 hours per week, and the work is easy enough that someone with a mild disability could do the work with little to no trouble.

Many who live in campgrounds year round do so just because it is a fairly cheap and easy way of life. Monthly rates in many parks here in Colorado are under $400.00 per month, plus your electric and propane, and phone if you do not have a cell phone. There is no lawn to mow. Your home is small, so repairs will be easy for the most part, and not huge. You can replace an RV roof for about $1000.00, and a day or two work. Try replacing the roof of a house for that price! RV parks, (campgrounds), have full bathrooms with showers. They also have laundry rooms with washers and dryers. There are a few that do not have laundry rooms, but we only found two between Indiana and Colorado that did not have a laundry room. Some RV parks have swimming pools, hot tubs, rec. rooms, playgrounds, and a lot more. RV park/campgrounds are like small communities of people who enjoy living in the RV or 5th wheel.

Living in an RV is actually a lot of fun. Many RV’s and 5th wheels are made for full timing now, and are quite spacious. They have slides that can double your space depending on how many the RV has. They are fully furnished, and many of the newer models have fireplaces in the living rooms!

Living in an RV park can be just as much fun as living in the RV itself. Depending on the state you choose to live in, and what park you choose, you can have a wildlife wonderland just out your back door. We live in the high mountains in Colorado, and it is a wildlife park right out our door! We have a fox that comes to visit us often, and he is so adorable. There is a momma bear and her baby cub that come and wreak havoc on the trash dumpster up front almost every night, and the deer are in great abundance right out our bedroom window.

Our family loves living in an RV park/campground, and not one of us want to live anywhere else right now. We love our RV, it has just enough room for us, and is very cozy and our home. We all look forward to when we can own a Fleetwood Regal 5th wheel, that is our dream RV, and it is a beauty too. Don’t believe me on that one though, you can see for yourself how awesome this rig is, just click here. As you can see, it is a real beautiful home, and is our dream rig!

So the next time someone asks you if you would live full time in a campground, you’ll have a whole new picture of what they are talking about, and may even consider it. It’s great!!!

Leave a comment

Filed under Survival Manual, __4. Shelter Issues

Emergency Tent Living, Part 3 of 4

(Survival Manual/ 4. Shelter Issues/ Emergency Tent Living, Part 3 of 4)

Living off-grid in a tent

A.  Why we’re living in a tent – in winter
10 February 2012, The Guardian, by Patrick Barkham
Pasted from: http://www.guardian.co.uk/lifeandstyle/2012/feb/11/family-living-in-tent

tent2 cookingWhy on earth would Matt and Lily Gibson give up their house and take their baby daughter to live in a tent in the countryside? Patrick Barkham finds out…

The stove has to be topped up with logs every two hours to keep the tent warm.
A white frost clings to the fields and the mud on the farm is frozen hard. In a secluded paddock behind the stone farmhouse stands a small bell tent, a curl of smoke rising from the metal flue poking out of the canvas. The temperature dropped to -7C the previous evening but inside the tent it is surprisingly warm, which is just as well because since the middle of January this octagonal dwelling, 5m wide and mounted on old pallets above the mud, has been the home of Lily and Matt Gibson and their nine-month-old daughter, Louise.

As unpaid bills mounted, and the couple struggled to pay £625-a-month rent for a dilapidated house, they made a drastic decision: they believed they would be better off, and happier, trying to survive in a tent. When their tenancy agreement expired on 15 January, they pitched a tent they had bought for £370, borrowed from Lily’s mother, on a farm in the west country.

“The mud and rain may be depressing, but the cold is scary,” admits Lily. “But we’re glad we’ve done this, even though it is frightening sometimes thinking about our responsibility for Louise and how we must keep her warm.”

The wood burning stove inside the tent is their life. Everything is focused on keeping the fire burning. Every two hours at night, Matt must get up to feed it more logs. So far, it is working. It may be freezing outside but under a single layer of canvas, the couple have created a snug and idyllic-looking – if minuscule – home. The tent smells of wood smoke and a delicious beef and vegetable broth is bubbling on the stove.

Matt was working in retail, spending wages on an expensive commute to a nearby city, and Lily, a freelance graphic designer, had stopped work when Louise was born. “Matt wasn’t getting home until 7pm and we still couldn’t afford to live properly,” says Lily. “We paid all our rent but we weren’t ever going out. We weren’t buying new clothes. We didn’t even get our hair cut. We’d occasionally get a coffee with friends in the town, but we were living very frugally. There was no way we could save at all and we wanted to do something for Louise’s future. We tried to be positive and we wanted her to have a happy home, but it was really quite depressing.”

Then they chanced on a press cutting about Simon Dale, who built his own eco-home for £3,000. This inspired them to take the first steps in their dream of buying a plot of land and building a low-impact home on it. “For me it was also inspired by the Occupy movements across the world,” adds Lily. “I don’t know what they might achieve but they have shifted consciousness in some way.” Previously, she assumed that “if we could not afford our rent it was because we were not budgeting properly. The Occupy movement made me see it wasn’t my fault – that it was the system that was not working.”

Matt and Lily began by finding a farmer, a friend of a friend, who generously allowed them to pitch the tent on his land. Matt has quit his job but the couple are not claiming unemployment or housing benefit – Matt does farm work between cutting wood for their stove. It may sound romantic but the challenges of living simply under canvas are daunting.

“A lot of people would go mad in a tent at this time of year. People could find a million and one things to burst into tears about,” says Lily. This morning, she hung her one warm jumper on the stove flue to warm up for a minute, got distracted by Louise and singed the jumper. “You definitely need a sense of humour and you can’t be vain – you’re just going to get upset by the mud or lack of running water.”

Inside the tent are nice rugs, plants and homely trinkets the couple have picked up on their travels. “It’s got that nomad feel to it, which I love,” says Matt. It has been a steep learning curve, however. Because the sides slope inwards there is far less space than they anticipated – no furniture can be allowed to touch the canvas or the rain will come in. They have been flooded already, and after they failed to secure the stove flue, it blew down in a gale. It is now firmly screwed in place.

To begin with, they lived off tinned food heated on the stove top. “We were sat there for three hours wondering why things wouldn’t come to the boil,” says Lily. Since then, she has mastered slow cooking – Turkish meatballs with rice, pot-roasted chicken with roast potatoes and even omelet’s in tin foil – while Matt has learned how the type and size of log can radically alter the stove’s heating power. Although he is doing less paid labor now, he says his days seems fuller. “There are not enough hours in the day now.”

Washing is done with a Wonderwash, a hand-cranked machine Lily imported from the US for £80. Clothes are cleaned with six jugs of hot water and two minutes of vigorous cranking, followed by 30 seconds of cranking in cold water to rinse. As the tent is a temporary measure, they borrow the downstairs loo at the farm and pay to have an occasional shower and charge their phone. “There is more drudgery, like hand-sweeping the floor, but it is more liberating and empowering as well,” says Lily. “The simpler things are, the less alienated you feel from your own life – the more in control you are.”

They have had to learn to prioritize certain jobs in the precious daylight hours. After dark, they light the tent with candles. There is no television, although Lily gets the internet on her phone. “We like talking, we sit around the fire and I sing to Louise a lot,” she says. “We haven’t felt bored, not for a moment. We don’t miss having loads of TV channels showing things we don’t want to watch anyway.”

As they explain how they are coping with living in a tent, Lily and Matt are clear that their priority is Louise. They are meticulous about sterilizing her bottles and ensuring that she is never cold. She and Matt may exchange nervous glances when the wind howls outside, but Louise loves it. For her, it seems that the tent is a secure home, where she can be physically and emotionally close to her parents. “So far she seems to be flourishing health-wise,” smiles Lily. “She is very happy, alert and engaged with what’s going on.” Their concerns about Louise are assuaged by the knowledge that, in the worst-case scenario, they can seek a warm refuge in the farmhouse, as they were forced to on the night a storm destroyed their stove flue.

Their parents have been very supportive – “They get concerned when it’s cold and ring to check we are OK,” says Lily. What would they say to people who would see them as reckless for living with a small child in a tent in midwinter? “What we’re doing might seem irresponsible,” says Lily, “but if we stayed where we were with unaffordable rent we would have ended up in so much debt that we wouldn’t have been able to feed Louise properly or get her warm clothes. It was terrifying. We would have been very depressed and therefore not able to produce a positive home environment for her and we would have ended up more dependent on benefits as well. We’re trying to stand on our own two feet.”

Living in a tent places them at the mercy of the elements, but Matt and Lily feel they have taken control of their own lives. By staying temporarily in the tent, they hope to save up to buy a piece of land on which they can build their own eco-home, a roundhouse with straw bale insulation. They are not just surviving: they are learning off-grid living skills they hope to teach to other families who want to live in a simpler, more sustainable way. Ideally they want to build their eco-home this summer but so far have been too busy keeping warm to find land. They admit their hope of buying a secluded half-acre on a south-facing slope, with a stream, for a few thousand pounds is probably unrealistic.

They may have chosen to live like this but, like other hard-pressed families, Matt and Lily have found that economic pressures made their old way of life intolerable. They believe more working families will be forced to live like they do, as rents and bills rise and first-time buyers are permanently priced out of the housing market. The government, however, seems unwilling to help people like Matt and Lily to help themselves. To get planning permission for a low-impact house on rural land requires navigating an impenetrable planning maze.

Lily would like to see reforms to encourage more self-built, low-impact housing. “There should be assistance to help people do this, not obstacles,” she says.

The reality of life in a tent in the middle of a British winter is far from bucolic but there are unimagined benefits. Sustained by their dreams of a self-built home, Matt and Lily are determined to accentuate the positives. Lily has noticed how well Louise sleeps at night in the tent. In fact, they all sleep much better than they did. On clear nights, the moonlight shines through the canvas and they hear the hoot of owls and the barking of foxes. Are they woken by the cockerel in the morning? “There are about 15 of them, which Louise loves,” says Matt.

“I love the sound of rain on the canvas, the candle light and the wood smoke. I like everything being simplified,” adds Lily. “It might be a cliché to talk about being in harmony with or close to nature but an element of that is very true.”

[Note: How do you heat the tents during a cold winter?
Answer: We recommend using space heaters, propane heaters, or a centrally ventilated heating system (easily run in through a deck vent). We DO NOT recommend using open flame to heat the tent. Canvas is a fabric material, and even though we do have customers who do use open flame in their tents and we’ve never encountered a problem, you are more prone to fire accidents if you use fire.
(Pasted from: http://www.exclusivetents.com/faq.htm#platform) Mr. Larry]
.

B.  Living Off-Grid in a Tent
March 2011, By Bob Wells
Pasted from: http://cheapgreenrvliving.com/Tent_Living.html

[The following example of tent living is provided just to show what one can do, its not the life style I would suggest for long term tent living, being way too Spartan for my comfort. Kudos to “Desert Rat” for setting up a generator-deep cycle battery-inverter- power system. On a higher initial budget this operation would have been better with a larger tent, more amenities and solar power. There is a lesson to learn in the life stories people tell, this story speaks to the possibilities of Internet connectivity while in a remote or possibly, regional “grid down” situation. Mr. Larry]
tent2 eureka cu canyon 12

[Looks like the Eureka Copper Canyon 12 (12′ x 14′) Mr. Larry]

No matter how small a house or apartment you live in, it is hard on the environment. First, the huge amount of material required to build a house has to be produced, at an enormous price to the planet. The raw materials (ores, minerals, wood and oil) have to be extracted from the earth, transported to  be processed, be processed, then transported again to wholesalers, then transported to retailers, then transported to the job site. You read that last sentence really quickly, but it represents a great deal of damage and pollution to the planet. Once the house is built and you move in, you must buy furniture and lots of “stuff ” to fill it.
All of those things do more damage to the earth. The house has to be heated and cooled to make it comfortable. You can’t sit in the dark, so the house needs lots of lights to keep it bright. For cooking you need a stove/oven refrigerator and dishwasher. You can’t possibly stay clean without hot water, so you need a 50 gallon hot water heater. The lawn and landscaping has to be watered, mowed and tended to. All of those utilities require huge amounts of pollution to produce electricity, bring you water, and process your sewage. One more way houses damage the earth: a long commute to and from work. Nearly all of us have to work, and the majority of us work in cities. So five days a week you drive to and from work in your car, often crawling along in miserable  traffic.

Contrast all of that to a friend of mine I will call Desert Rat. I met Desert Rat in the desert of the Southwest where he was busy working from his tent. He was sick of the rat race so he decided to chuck it all and move to the desert. He was fortunate that he could work from home via the Internet. He didn’t know for sure where he was going, he just knew he wasn’t going to be living in a city any longer. He had heard about dispersed camping on BLM desert land and National Forests, so he decided to give that a try. He had a plan, in the winter he would live in the warm desert and in the summer he would move up to the cool National Forests. Since nearly all BLM (Bureau of Land Management) and National Forest land has a 14 day stay limit, he knew that all he had to do was carry 14 days worth of supplies, and then he had to move anyway.

He got a Verizon data card and cell phone so he could work from anywhere. His pattern is that he goes out to a place where he gets a good Verizon signal (which is an amazing number of places) sits up camp and stays there for 14 days without starting his car again until the 14 days are up and he is out of supplies, then he breaks camp, gets supplies and moves on to the next camp spot. He gets the seclusion he needs and does just about the absolute minimum damage to the earth that a human can do in the twenty-first century.
Everything he has is as small, light and fold-able as he could find in order to fit it in his small economy car.
tent2 coleman white gas and gasoline stores
When he was preparing for his new life, he decided that essentially, he was going on an extended camping trip (for many years he hoped), so he went to an outdoor store and outfitted himself. He needed something to live in, so he bought a large, high-quality tent made by Eureka. It is a great tent! In the two months we camped together we had several storms blow through that brought winds well over 50 mph. The tent weathered them like a champ! He needed to
cook so he bought a Coleman 2-burner, dual fuel stove. He got it instead of a propane stove because he was already carrying gas for his Yamaha generator and he didn’t want to have to carry a second fuel.

He needed consistent power in the middle of nowhere, so he bought a Yamaha Generator which (along with the Honda) is famous for its reliability, quiet running and low gas consumption. I found it interesting that he set it up on a 5 gallon bucket to keep dust and dirt from coming in through the air filter when running. I thought that was a very good idea. He carries 10 gallons of gas which easily lasts the 14 days for running the generator and cooking.

He has deep cycle batteries he leaves on the floor-board of his car since they are too heavy to be carrying around.  He runs an extension cord from the generator to a battery charger in the car which charges the batteries. From the batteries he runs cables into the tent. In the picture below, top- right, we see the inverter and cords that run the many electrical items he uses for work.
tent2 interior power & inverter
In the picture above, lower- left, we see his office. Having a comfortable chair is important, so he bought a good folding recliner. A portable table holds his laptop and he uses five gallon buckets for tables.

His bed doesn’t look like much but, he has the highest quality self-inflating sleeping pad that Thermorest makes which is very comfortable. He is a cold sleeper so he has two sleeping bags so he can sleep inside both of them when it is cold, or just one when it is warmer. The desert can be surprisingly cold at night!

His tent is 12×14 feet and over 6 feet tall. That is a huge amount of room for one person, and would be more than enough  for a couple as well. He finds it very comfortable.

He carries a total of ten gallons of water in his two Coleman five gallon jugs. That’s enough for 14 days as long as he is conservative in its use.  Notice the spigot which makes getting water out and washing/rinsing easy. [If you plan to use a small utility trailer to carry your gear, I recommend increasing the water supply by bringing a 30 gallon potable water drum. The extra 250 lbs./30 gallons of water will keep you clean, bathed, keep your porta-pottie flushing, wash your dishes and laundry, as well as keeping your mornings coffee pot filled– without “cutting corners”. Mr. Larry]

All in all, it is a wonderful life! There is something magical about the desert that starts to get in your heart and changes you. Inevitably the strain and constant stress of city-living starts to fall away and a peace and contentment take its place. Desert Rat wasn’t sure if he would like his new life, but it has far exceeded his expectations. Already, he can’t imagine going back to his old life in the city.

It wasn’t his primary purpose, but a side effect of living this way is that it is one of the greenest, most environmentally friendly ways you can possibly life. He is completely off-grid except for the small amount of gas he uses to cook and for the generator. And that is much more than offset by the fact that he no longer commutes to work. In fact he only drives once every 14 days and that is in an economy car.
He is a true minimalist with nothing more than it takes to survive. His entertainment and joy come from nature.

tent2 alt solar additions

[Above, solar panel photos added by Mr. Larry, a recommended addition or alternative to the aforementioned generator.]
.

YouTubeC.  See the 5:04 video, “Off Grid: The tent in pictures,” at YouTube, click-or paste the following link:
http://www.youtube.com/watch?v=aGOS_XRkGVo

.

YouTubeD.  See  the 4: 47 video, “Off Grid: The ultimate bug out location,” at YouTube, click or paste the following link:
http://www.youtube.com/watch?v=X9HisSpOFkM

Leave a comment

Filed under Survival Manual, __4. Shelter Issues

Emergency Tent Living, Part 2 of 4

(Survival Manual/ 4. Shelter Issues/ Emergency Tent Living, Part 2 of 4)

Tent size and type

A.  What Size Wall Tent Should I Get? Size Comparisons & Layout Diagrams
Published at Back Country Chronicles
Pasted from: http://www.backcountrychronicles.com/wall-tent-size-comparison/

The size of a wall tent you need depends on several basic factors.

  1. How many people need to sleep in the tent?
  2. Are you sleeping on the floor or sleeping on cots?
  3. Are most of the people adults or children?
  4. Will the tent be for sleeping only or do you need space to congregate or to cook?
  5. Is the tent going to be for your family, a group of scouts or a group of unrelated adults?

Before we bought our wall tent, we read that we should consider 20 square feet (sq ft) per person for sleeping and 30 sq ft per person if more space was needed for cooking or other activities. The tent we bought (12 X 14) has 168 sq ft, so using those numbers, the tent should sleep 5-8 people. Table 1 shows the number of people that various sized tents can sleep using the 30 and 20 sq ft calculations.

Table 1. Tent Size, Square Footage and Number of People each Tent can sleep.

Tent

Total

Number

Number

Size

Square

Tent Sleeps

Tent Sleeps

(Feet)

(Feet)

@30 sq ft

@20 sq ft

   8×10     80         2         4
  10×12    120         4         6
  12×14    168         5         8
  12×16    192         6         9
  14×16    224         7        11
  16×20    320       10        16

If people were sleeping on the ground, especially if some of them are children, the larger numbers based on 20 sq ft per person is reasonable. You might get away with packing teenagers in like chord wood, but paying customers will not be very impressed. Even very good friends wouldn’t be able to sleep very well and might not stay good friends for long.

If the tent is going to be used for kids at camp or even as an emergency shelter, bunk beds could be built two or three beds high, to accommodate more people. This may not be the most comfortable situation, but everyone would be inside out of the wet and cold.

Cots add Comfort, but Take More Space
Cots may be more comfortable than sleeping on the ground, even on good pads, but cots take up more space. The average sized cot is about 32 x 76 (inches) which is 16.9 sq. ft. and XL sized cots are about 40 X 84 (inches) which is 23.3 sq. ft. So a 12 x 14 foot tent should hold 9 regular sized cots or 7 XL cots. But unless we plan to use wall tents for temporary shelter following a disaster, we are not trying to jam as many people in them as possible.

It might be mathematically possible based on square footage, to fit a certain number of cots into the area of different sized tents, but it may not be realistic. Mathematically, we should be able to fit 9 cots into our tent (12×14), but I cannot visualize but six cots fitting into the tent. Even then, some cots would have to touch each other and there would be very little space between cots. It would be possible to sleep close together, then pile cots on top of each other after everyone rolled out of the sack in the morning, to create more room to move around.

Wood stoves
Most people buy wall tents with the intention of camping during the Winter. Part of the appeal of the wall is the ability to heat it with a wood or pellet stove. Obviously, if there is a hot stove in the tent, there will be less room for cots.
Wood Stove Requires 36-40 square feet

Wood stoves come in several sizes
Small stoves are sufficient to heat small tents and larger stove are needed to keep larger tents warm.  It is recommended that some of the largest (16×20) tents may need two stoves. Our stove is a mid sized stove, 14 inches wide and 24 inches long. Based on where the smoke stack is placed in the front corner of the tent, and buffering the stove by 3 feet into the tent space, I assume the small and mid-sized stove take up 36 square feet. [About the same area as 1 person. Mr. Larry]  I assume that larger stoves take up 38 square feet. You can obviously move around and stand closer to the stove when necessary, but you should never leave cots, tables or anything else that may catch fire within three feet of a hot stove.

Before we bought our tent, I drew floor plans to see how many cots and tables would reasonably fit into different sized tents. We also plan to use a wood stove during cold weather, so the stove and a safety buffer around the stove has to be considered. These floor plans helped us decide the size tent we needed.

Generally, for tents, bigger is better, but size adds weight, costs more and it takes a larger stove and more wood to heat a larger tent. In the end, I think we got the best sized tent for the two of us.
Table 2 below was created from the scale diagrams. The table includes various tent sizes, the space required for the stove and the safety area around a hot stove, the Maximum number of cots I could fit into the area and the area, the number of cots I recommend be used in that space and the actual square footage that the recommended number of cots use.

 Table 2. Tent Size, Space for Stove, Maximum Number of Cots, Recommended Number of Cots and the Space per Recommended Number of Cots.

Tent Size(feet) Space (sq ft)for stove Max no. of cots Rec no. of cots Space (sq ft)per cot
8×10 36 2 2 22.0
10×12 36 2 2 21.0
12×14 36 6 4 33.0
12×16 38 6 5 30.8
14×16 38 7 5 37.2
16×20 38 10 8 35.3
16×20 76 10 7 34.9


Wall Tent Floor Plans and Headroom Diagrams
All Diagrams (Figures 1-10) are all scaled the same, with one foot equal 3 squares (4 inches per square). The human silhouettes are all 6 feet tall. All cots and tables are 32 inches wide and 76 inches long. Cots are 20 inches high and tables are 28 inches high. The black areas of the floor plans represent the wood stove. The red areas represent the safety buffer around the wood stoves and the gray areas represent cots or tables. Where there was room, notice all cots and tables are four inches away from all tent walls.

12 x14 Wall Tent
With only two of us using a 12×14 foot tent, we have plenty of room, including the table and the stove. There is room for a third cot, but the floor space is drastically reduced (Figure 1). Figure 2 shows the scale drawing from a side view to see the headroom of our 12 foot wide, 8 foot tall tent.

tent 12x14

[Figure 1. Floor plan for 12×14 ft Wall Tent]

8 x 10 Wall Tent
An 8×10 wall tent is small (Figures 3 & 4). If using a wood stove, I don’t see any way of putting more than 2 cots in the tent. In fact, one cot is within the three foot buffer that is recommended around the wood stove. When not using the stove, there will be room for a cot on each side of the thent, but there will not be room for two people to walk past each other (Figure 4).

tent 8x10

Floor plan and headroom for 8×10 ft Wall Tent.

 10 x12 Wall Tent
The 10×12 Wall Tent (Figures 5 & 6) is also small, but is able to hold two cots without invading the safety buffer around the stove. If  necessary, as many as 6 cots could be fit  into the tent if not using the woodstove. At least the 10 foot wide tent is large enough for two people to pass with cot or tables on each side when not using a stove (Figure 6).

tent 10x12

Floor plan and headroom for 10×12 ft Wall Tent.

 12 x 16 Wall Tent
A 12×16 Wall Tent may be able to hold five or six cots when using a wood stove (Figure 7), but the tent would be more comfortable for everyone if the tent were limited to four cots . Without the wood stove, as many as seven cots could be fit into the tent. The headroom of the 12×16 tent is the same as the 12×14 tent shown in Figure 2.

tent 12x16

Floor Plan and headroom for 12×16 foot Wall Tent.

 14×16 Wall Tent
A 14×16 Wall Tent easily holds five cots even with the wood stove (Figure 8). If necessary, seven cots can be fit into the tent with the stove. Without the wood stove, as many as eight cots can be fit into the tent. Figure 9 shows the 14×16 tent is wide enough to fit three rows of cots or tables if necessary. The roof of the wider tents are starting to get lower, but a 6-foot person’s head will not touch the roof unless they are standing at the edge of the tent.

tent 14x16

Floor plan and headroom for 14×16 foot Wall Tent.

 If you are considering buying a wall tent, we hope these diagrams help you make the decision about what size tent you need. When we bought our wall tent, our decision was between a 10 X 12 or 12 X 14 foot tent. We decided on the larger tent and have never regretted it. Our advice on tent size is if in doubt, choose the larger size you are considering.
.

B.  A few tents  that  you could live in rather comfortably

Tent Size (ft) Square Feet (with vestibule) Cost (with vestibule)
Eureka Sunrise 11 11 x 11 121          — $300          —
Cabela’s Alaknak 12×12 12 x 12 144      (216) $747      ($997)
Cabela’s Big Horn III 12 x 14 168      (240) $550      ($800)
Eureka Copper Canyon 12 12 x 14 168  (39%>ES) $450          —
Cabela’s Alaknak 12×20 12 x 20 240      (316) $1,034  ($1,284)

* Cabela’s vestibule (entrance room) for the Alaknac and Big Horn models cost $250.

.

_ 1.  Eureka! Sunrise 11  (11′ x 11′)
Cost $300 at Amazon.com

tent sunrise 11

[Eureka Sunrise 11]

  • Spacious square, dome-style tent sleeps up to six (11 by 11 floor; 121 square foot area)
  • Heavy duty bathtub floor made of 4-ounce 210D oxford polyester
  • Multicoated StormShield polyester fly won’t stretch when wet and resists UV breakdown
  • Includes corner organizer, wall organizer with mirror, two water bottle pockets
  • Center height of 84 inches; weighs 23 pounds, 15 ounces

Spacious enough to comfortably sleep up to six campers, the Eureka Sunrise 11 dome-style family tent is easy to set up and very well ventilated with four large hooded windows and no-see-um mesh panels in the ceiling. It has triple-coated fabrics and a heavy-duty bathtub floor made of 4 ounce 210D oxford polyester that repels water.

The fly is made of Stormshield polyester, which won’t stretch when wet and resists UV breakdown. It has a shockcorded fiberglass frame (two poles) that features a pin and ring as well as combination clip and sleeve system for quick assembly. Other features include:

  • Twin track D door with window for easy exit/entry
  • High/Low door vents top and bottom to aid air circulation
  • External guy points help secure the tent in high winds
  • Hanging gear loft/organizer
  • Two water bottle holders
  • Corner organizer and wall organizer with mirror
  • Tent, pole, and stake bags included

Specifications:

  • Area: 121 square feet
  • Floor size: 11 feet by 11 feet
  • Center height: 7 feet
  • Wall fabrics: 1.9 ounce Polyester Taffeta 1200mm coating/1.9 ounce breathable polyester
  • Floor fabrics: 4 ounce 210D Oxford Polyester with 1200mm coating
  • Fly fabrics: 1.9 ounce 75D StormShield polyester with 1200mm coating
  • Pack size: 8 by 33 inches
  • Weight: 23 pounds, 15 ounces
    .

_ 2.  Cabela’s Alaknak Tent  (12′ x 12′)
Cost $747 at Cabela’s.com
tent alaknak 12x12

[Top left: Alaknak 12′ x12′ model, Top right: with the optional vestibule]

  • The next generation in the Outfitter Series tents has enhanced safety features and user-friendly updates that take it to a whole new level.
  • Sidewall condensation vents now have hook-and-loop closures all around the perimeter for better ventilation control.
  • Three large multi-panel windows each have a zippered cover, a clear vinyl window that zips out of the way, and a mesh screen for added ventilation.
  • The stove jack is covered by a storm flap that now rolls down to avoid contact with the piping, so it won’t melt the material.
  • This 12-ft. x 12-ft. tent has 4-ft. walls and an angled roof window which will comfortably sleep six, with plenty of room for a stove.
  • Rugged, waterproof 250-denier polyester oxford X-Treme Tent Cloth has a high tear strength and resists punctures for lasting reliability. 10 perimeter tent poles keep the sidewalls from blowing in and add rigidity in high winds, so you can camp comfortably knowing you’re protected.
  • The heavy-duty No. 10 YKK® zippers and inverted T-style door makes entering and exiting the tent easy. Plus, it’s backed by a screen door, so you can let cool breezes in while keeping bugs out.
  • The attached awning boasts a frame that comes down from the peak of the tent and directs runoff away from the door for superior protection in the wettest weather.
  • The interior sidewalls have unique fold-down shelves that sport cup holders to eliminate spilled beverages and gear pockets to hold gear.
  • The floor has a zip-open panel for safe placement and stove use.
  • Tent sets up quickly and easily. Includes 12″ steel stakes, guy ropes and a large zip-close storage bag.
  • Tent body dimensions: 12 ft. x 12 ft. (144 ft2)
  • Overall weight: 31 lbs.
  • Frame weight: 23 lbs.
  • Stakes weight: 13 lbs.
  • April 2013 cost approximately: $747
  • Optional vestibule (11 ft Lx 9 ft W O.A., with about  72 ft2 real area) which provides a sizeable “under cover” area  for storage/ cooking. About  $250 cost
    .

_ 3.  Cabela’s Big Horn™ III Tent (12′ x 14′)
Cost $550 at Cabela’s.com

tent big horn 12x14

  • Sturdy enough to take on extreme conditions
  • XTC fabric repels rain and snow with ease
  • Heavy-duty steel frame ensures support
  • Hexagonal design maximizes interior space
  • Three large multiple-panel windows
  • Zippered opening in the sewn-in floor for a stove

This is a new and improved version of our already popular Big Horn II tent, and we made it sturdy enough to take on extreme conditions encountered on extreme adventures. It’s a roomy single-wall tent made of XTC fabric that repels rain and snow with ease, and is tough enough to handle harsh foul weather. A heavy-duty steel frame ensures support to withstand wind and precipitation.

The tent measures 12 ft. x 14 ft. with an 8’6″ roof tapering to 5’6″ sidewalls.

The hexagonal design offers room for cots, gear and a stove around the sides while leaving the middle area open. We moved the stove area to keep the wall near the stove cooler.

Three large multiple-panel windows include zippered covers, a clear-vinyl zip-out window and a mesh screen. There are three fold-down shelves that have mesh cup holders.

There’s a sidewall stove jack, a storm flap and a heat-resistant insert, as well as a zippered opening in the sewn-in floor for a stove.

The inverted “V” door is outfitted with a heavy-duty zipper. Includes 12″ steel stakes, guy ropes and zippered storage bag. The stakes weigh 11 lbs.

Tent and frame weight is 72 lbs. Imported.
.

_ 4.  Eureka! Copper Canyon 12  (12′ x 14′)
Cost $450 at Amazon.com
 tent cu canyon 12

[Eureka Copper Canyon 12 tent (12′ x 14′)]

  • 9-pole cabin style tent with 14 x12 floor space and 7′ center height will sleep 12 with 168 sq ft of sleeping area.
  • Removable divider curtain creates two rooms for privacy, or roll back to reveal one large room
  • 2 large D-style opposing doors, with half windows, allow versatile entry
  • Windows on each side offer visibility and ventilation
  • Full mesh roof allows circulation of air and reduces condensation
  • The Eureka Copper Canyon 12 is a 2 room, Cabin style, straight walled family tent that will sleep 12 people.
  • 2 large ‘D’ Style doors simplify exit or entry.
  • 6 large windows and a generous roof vent allow for excellent ventilation. Windows feature ‘Quick Stash’ feature – stows window flap easily without loops or toggles.
  • Complete with a zippered removable Room Divider so you can have 1 or 2 rooms.
  • The hybrid steel/fiberglass frame is sturdy and reliable.
  • Factory sealed floor and fly seams mean you will stay dry and comfortable in summer storms. The

coated polyester fabrics are durable and long lasting.

  • Set up is a breeze with shock-corded poles that attach with a combination of clips and sleeves and

that makes set up faster and easier.2 Rooms – Zippered Room Divider can be removed for 1 or 2

rooms.

  • Poles attach to tent body via pin and ring for fast and easy set up.
  • Combination of clips and sleeves make set up fast and easy.
  • 2 mesh gear pockets for internal storage, clothes line loops and flashlight loop.
  • Poles are sturdy chain corded Powder Coated steel and shock corded fiberglass.
  • Cabin style straight walls maximize interior living space.
  • Twin track zippers for separate operation of the window in the door.
  • External guy points on the fly help secure your tent in high winds.
  • Guy Out Pockets store and secure guy lines when not in use.
  • E! Power Port – zippered flap allows for an extension cord to be run into the tent.
  • 2 Gear lofts included.
  • All carry bags and stakes included.
  • Fire retardant. Import.
    .

_ 5.  Cabela’s Alaknak Tent  12′ x 20′
Cost $1034 at Cabala’s.com
tent alaknak 12x20

[Top left: Alaknak 12′ x 20′ model, Top right: with the optional vestibule]

  • Sidewall condensation vents now have hook-and-loop closures all around the perimeter for better ventilation control. Three large multi-panel windows each have a zippered cover, a clear vinyl window that zips out of the way, and a mesh screen for added ventilation.
  • The stove jack is covered by a storm flap that now rolls down to avoid contact with the piping, so it won’t melt the material.
    This 12-ft. x 20-ft. tent sports all the room of a traditional wall tent with extra-tall 5-ft. walls for more headroom around the edges.
  • Equipped with two large doors for easy entry and exit, and two center support poles for added stability.
    Rugged, waterproof 250-denier polyester oxford X-Treme Tent Cloth has a high tear strength and resists punctures for lasting reliability.
  • 10 perimeter tent poles keep the sidewalls from blowing in and add rigidity in high winds, so you can camp comfortably knowing you’re protected.
  • The heavy-duty No. 10 YKK® zippers and inverted T-style door makes entering and exiting the tent easy. Plus, it’s backed by a screen door, so you can let cool breezes in while keeping bugs out.
  • The attached awning boasts a frame that comes down from the peak of the tent and directs runoff away from the door for superior protection in the wettest weather.
  • The interior sidewalls have unique fold-down shelves that sport cup holders to eliminate spilled beverages and gear pockets to hold gear.
  • The floor has a zip-open panel for safe placement and stove use.
  • Tent sets up quickly and easily. Includes 12″ steel stakes, guy ropes, 10 perimeter tent poles add rigidity in high winds and a large zip-close storage bag.
  • Tent body dimensions: 12 ft. x 20 ft.
  • Tent body weight: 49 lbs.
  • Frame weight: 41 lbs.
  • Stakes weight: 16 lbs.
  • April 2013 cost approximately: $1034
    .

* Optional vestibule (11 ft Lx 9 ft W O.A., with about  72 ft2 real area) which provides a sizeable “under cover” area  for storage/ cooking. About  $250 cost.
tent cabelas vestibule


YouTube.
See a family living with apparent comfort and style in an Alaknak tent at YouTube, click the following link. The video demonstrates that with a little forethought a larger tent can be made quite habitable:
http://www.youtube.com/watch?v=RhgeF9dbJp8

Leave a comment

Filed under Survival Manual, __4. Shelter Issues

Emergency Tent Living, Part 1 of 4

(Survival Manual/ 4. Shelter Issues/ Emergency Tent Living, Part 1 of 4)

You never know when you might be forced out of your home by a disaster or need to leave in order to preserve the safety of your family in an emergency situation. When that time comes – the main thing you need to have in your gear is a good, sturdy tent. Be sure to choose a tent that is appropriate for your family size and the geographical region where you live . Don’t wait until it’s too late – protect yourself now by purchasing a quality shelter you can use in a worst case scenario.

Post Disaster Emergency Shelters
Exerpts pasted from: http://shtffood.com/shelter.htm
Emergency temporary shelters are places for people to live temporarily when they can’t live in their current residence due to a SHTF situation. An emergency shelter typically specializes in people fleeing a specific type of situation, such as natural or man-made disasters, civil unrest, or somewhere to stay at a tent logotemporary destination. A post-disaster emergency shelter is often provided by governmental emergency management departments such as FEMA or the Red Cross. Tents are the most common temporary structures for a single family. After Hurricane Katrina FEMA provided dislocated families with small white trailers. These settlements may be inhabited for the entire duration of the reconstruction process and can be thought of more as settlements than shelter. Unfortunately, planning for water / sanitation is often inadequate.

Ideally, if you are in a bug-out situation, you will bring your own shelter.  While a tent is sufficient in warmer climates, it may not work well in winter. In that case, a motorhome or trailer you can pull with your own vehicle may be a better option. Like a permanent bug out location, a movable shelter needs to be stocked with the necessities you’ll need to get by for as long as the emergency lasts. This can be difficult with a tent, but when no other options exist, at least it provides a dry, warmable place to wait. Cooking will have to be outdoors as will the latrine – not for everyone.

Family Tent
Excerpts pasted from: http://procurement.ifrc.org/catalogue/detail.aspx?volume=1&groupcode=111&familycode=111001&categorycode=TENT&productcode=HSHETENT01
The standard tent for a family of five conforms to the recommended minimum-standard living area for hot and temperate climates (37 sq ft per person). Improved insulation for family tent is recommended for cold climates. The tent is not a long-term habitat solution. It is meant for emergencies. It has a minimum 1-year lifespan, irrespective of climate. It has a minimum shelf-life of 5 years under normal warehousing conditions (in a dry, clean and ventilated warehouse – not in containers or tented warehouses – and stored on pallet racks or pallets elevated off the ground, not piled). The tent is vulnerable to rain and moisture when packed. The tent design was developed by shelter specialists to ensure a product fit for human use, ensuring the minimum required outdoor lifespan in all climates, at minimum cost.

tent BH III close up

A.  Extended Tent Camping
26 Jul 2010, Yahoo! Voices, by Carrie Hetu, Yahoo! Contributor Network
Pasted from: http://voices.yahoo.com/extended-tent-camping-6433286.html?cat=7

Considering Life on the Road in a Tent
While it may not be highly popular and certainly not highly publicized, there are those who choose a lifestyle involving extending tent camping. Basically a choice to live in some type of tent while either traveling or staying put in the tent on somebody’s land for an extended period of time. For some, it may be more of a forced option after foreclosure, eviction or job loss. Yet for others it is very much a conscious choice for whatever personal reasons they may have such as a desire for sustainable living or simply the pleasure of traveling and life on the road. Whatever the case is, there are several things to consider, especially if it will involve full time traveling.

Choice of tents will be something to devote a lot of thought on as most nylon tents are really not made to be living in and lack durability. Reinforcing the seams may help aide in a longer lasting tent. The attraction to nylon tents is that they are quite reasonable in price. They are also fairly easy and quick to set up. Rain tarps will also help tremendously in keeping the tent, you and your belongings dry in rainy weather. Of course size is always a consideration as well for it must be able to comfortably sleep the number of people who will be staying in it.

Canvas Wall tents while pricey may be the best choice if you can readily afford them. They are roomy, can have a wood stove fitting on them, extra ventilation windows and were made more durable for miners and hunting campers that typically stayed for lengthy periods of times in them. Of course you will also then have the added expense of purchasing a wood stove, as when traveling you are never sure if you may get caught on a few wintery or just plain cold nights.

If you have a car, then most likely you will need to purchase a pull behind trailer to store all your belongings, especially if you have several people in your group or family who will be coming. These typically can run from $300 to $700 for a good used one and again durability is a big consideration in purchasing one. An all metal one would most likely be your best option here as wooden ones can fall apart and will not last near as long. The length you would need would depend on how much you really need to take with you, depending on the number of people that will be with you. Make sure your vehicle will easily be able to haul it without due stress on the engine when going up and down really steep inclines. If you have a suitable Truck, a trailer may not be necessary then.

Of course money always must be a top consideration as money makes the world go round and you will need some. You will have to figure out how much you will need a month to cover camping fees, although there are places you can camp for free, you will most likely want some paid camping sites that offer showers, water and other amenities. You will need to consider how much you will need for gas, food, car insurance and perhaps other things like cell phone and mail service. On a low side it may run a family around $600 a month yet on a high side perhaps around $1500 depending on the quality of life you are looking for and the things you typically like to spend money on.

Once you get an idea of how much you need a month, then you need to figure out how you plan on acquiring this money to supply your needs. Will it come from money you have saved or will have once you sell everything off if you plan on giving up your residency for life on the road? Will you work along the way or have work you can do on a computer from anywhere? Do you plan on having an emergency fund to cover auto repairs or to get another place to live if you find you do not like life on the road? This may be a wise thing to have in place before you plan on embarking on your journey!

If you plan on giving up your residency then downsizing will have to be considered as it will be a MAJOR downsizing undertaking. You will need to sell everything you do not absolutely have to have, sticking to the items you will have to take with you in order to cover your basic needs. This can cause a sense of stress for those who are attached to material possessions yet can be a liberating experience to cross over to sheer simplicity.

4 seasons must be considered when purchasing the things you will need on the road. While you can tend to follow weather when traveling, you can not always guarantee you will be in pleasant, dry weather. Weather is unpredictable and yet your lack of knowledge of certain areas may catch you in less than desirable weather as well. It is best to be prepared for any weather conditions and purchase items and pack accordingly. It would not be much fun to be in a tent in negative zero weather, with no heat and only short sleeve shirts, not to mention that would be a tad dangerous!

Dreams and ideas must be considered as well as they rarely live up to what our mind holds in conjunction with reality. Expect the unexpected and really try to look at the reality aspects of things that could happen. Lengthy rain periods may have you dealing with mold, lack of jobs may leave you financially strapped, broken down vehicles are never a pleasant experience. Wildlife may rampage your food supplies if you are careless or even try to enter and tear up your tent. It will not always be that romanticized image of a perfect life you may see in your mind. Be prepared for the worst but expect the best may be totally appropriate for this endeavor.

Besides a tent, consider what other equipment needs you may have such as an actual spare tire on a rim and full of air rather than just a doughnut. Other things you may need, want or should consider yet not a complete list would be:

  • First aid kit
  • Sleeping gear
  • Coleman stove
  • Cast iron cookware for cooking on open fire
  • Flint and steel for starting fires in wet weather when matches or lighters would not work
  • 5 gallon bucket with a loo cover for a toilet
  • Solar shower
  • Water jugs to fill with water before going to some free camping areas where water is not available
  • Fishing gear
  • Axe and shovel
  • Flash lights
  • Solar weather radio with cell phone charger
  • GPS system or atlases
  • Emergency glow sticks and flares
  • Extra tarp covers
  • Clothing for all weather types
  • Hiking boots
  • Basic tools such as a hammer, saw, wrenches and screw drivers
  • Lap top computer if you can work from computer for pay
  • Batter cables for car
  • Jack for car
  • Cooler for cold food storage
  • Emergency food bar packs
  • Emergency thermal blankets
  • Pocket knives
  • Tent fans
  • Tent heater or wood stove depending on type of tent you purchase
  • Silicone seam sealer
  • (Add a 12 volt deep cycle battery, 60-150 watt solar panel, solar charge controller and 275-400 watt inverter. Mr. Larry)

While extended tent camping may not be for everyone, for those who are considering it, hopefully this will aide you in making some wise choices to get you off to a good start! Have fun and be prepared!

.

B.  How to Live in a Tent
Edited by Minuteman, Celeste, Puddy, Jack Herrick and 11 others
Pasted from: http://www.wikihow.com/Live-in-a-Tent
tent copper canyon

So maybe you want to prove some kind of point, maybe you’re camping for an extended period of time, maybe you’re stranded on a deserted island (unlikely but possible), maybe you are very poor and have lost your house, but the bottom line is, maybe you have to live in a tent for a while. This is a step by step guide to comfortable living in a tent!

1.  Buy or find a 2 or 3 rooms tent. I would recommend if more than one person a five room, a big one. This provides space for a bedroom, living room, and bathroom. You will also need storage place for kitchen stuff, food, clothes and some other possessions. Feel free to adapt any of the rooms into a space that better fits your needs, you may consider replacing any of them with one of the following: Kitchen, spare bedroom, storage room, or hallway if it’s too small for use.
2.  Use a thick blanket or rug remnants for carpeting. This will help keep out the chill on a cold night and also provides extra cushioning when you need to sit or lay down.
3. Buy a fan and/or a heater to use. Do Not put these near walls as they may tear or set fire to your tent. Make your choice of fan or heater depending on the location and season.
4.  Use pillows for a couch, and you can also use pillows for the bed, making things more comfortable in your temporary living space.

5.  Attach a light in each room. Make sure it will not catch the tent on fire by stringing them in the middle of the room and keeping them off as often as possible.
6.  Consider hooking a lock onto the zippers. This will keep out any unwanted guests and help ensure safety from the “bad people” of the world. (Look at the small, light weight, luggage locks sold through Walmart or Amazon.com. Mr. Larry)
7.  Buy a solar powered kettle. That way you can enjoy a hot drink!
8.  Make sure you have a mini gas stove or cooker. That way you can have a warm meal.
9.  Make sure you have a warm, comfortable sleeping bag each. That way you will be comfortable during the nights.
10.  Consider buying an air bed each. The bare ground can be very uncomfortable and cold, even in the height of winter. Or instead of an air bed, find a thick fold up air mattress, there are tri fold ones that are about 3″ thick, that way you don’t have to deal with the air mattress deflating.
11.  Consider buying small shelves for any items likely to be used sparingly or books.
12. Enjoy nature!
13.  If you are using nature as a toilet, make sure you bury and waste. Or you can Buy a potty or bucket and bury after.

Tips
•  Buy a durable, maybe even 4 room tent to ensure a comfortable, enjoyable experience.

Warnings
•  Make sure there are no ant beds nearby. [If Fire Ant nests are found locally, carry appropriate ant poison. Mr. Larry]
•  Make sure you are not on rock ground or a slope.
•  Check if you can have a campfire in that area before you do because if you don’t, you could end up with a large fine to pay.

 .DSCF7931

.
C.  Thread: full-time tent living…anyone doing it?
Aug 2012, CampingForum.com, by excerpts from the Forum member discussion
Pasted from: http://www.campingforums.com/forum/showthread.php?4430-full-time-tent-living…anyone-doing-it

_1.  Re: full-time tent living…anyone doing it?
I’ve lived in a tent for up to six months at a time and done it several times. Each time, I was traveling cross country and staying anywhere from a few days to a couple of weeks in each spot.
The hardest part is controlling expenses. Everything is more expensive. Laundromats are more expensive than owning a washing machine. Cooking with propane bottles is more expensive than cooking in a house. Groceries, and keeping food cold is expensive without a home refrigerator. At $20 a night, campgrounds are not cheap rent! There are a million examples like that. Cost control is going to be a constant issue for you, especially if you are maintaining a real home somewhere that you’ll eventually go back to.
If you can keep the expenses under control, then the payoff is in the places you get to stay. Long term camping can be a wonderful experience.

Here’s a few tips I’ve learned…
•  Tint your windows dark enough that a thief can’t see any gear in the back. Don’t keep any gear in the front where a thief can see it.
•  Make sure you have theft insurance on the contents of your vehicle, not just the vehicle. Camp security and vehicle security are going to be issues for you no matter where you go. I recommend you carry a firearm, but that’s up to you of course. A firearm is the ultimate equalizer when it comes to a confrontation with a robber.
•  It helps if you have a rock solid, well maintained vehicle. I always carried AAA Plus for towing.
•  Solar power is your friend. Get a solar panel for your roof and a 12V sealed battery, like an Optima Yellow top to power all your electronics.
•  Have a support person. This could be a relative who is far away. Someone who will answer your phone calls at any time of day and do everything from give you a weather report to taking your mail.
•  Use a mail drop service. RV’ers have a lot of experience in this area. Search around for RV and mail and you’ll see all the options out there. Most run around $250 a year and will forward your mail to you at campgrounds. South Dakota is a favorite location because their residency rules are very lax and you can renew your car tags by mail and there is no state income tax there.
•  Arrive at campgrounds on a Tuesday or Wednesday and stay through the weekend. Most campgrounds are empty on those days. Show up on Friday and good luck getting a prime spot or any spot for that matter.
•  Try ‘dispersed camping’ as much as possible – you’ll save thousands of dollars.
•  Living in a tent is very isolating. Don’t become a recluse. Meet new friends. Spend time with people. Get out of the campsite as much as possible. Spoil yourself with a hotel stay once in a while.
•  Don’t break the rules. Your gear will get confiscated (and they’ll destroy most of it when they confiscate it), they’ll tow your car and charge you for towing and storage, and you’ll be facing a judge in a strange town where the prosecutor’s first words to the judge will be: “Your Honor, this transient has no fixed address”. It’s all downhill from there. Follow the rules, even if they sometimes seem ridiculous. I’ve never had it happen to me, but we all hear horror stories.
•  Start with the absolute minimal gear you need. As time goes on, you’ll figure out what’s critical and what isn’t and you can slowly add gear that you need, not just gear you want or think you need. You’ll burn through a lot of camping gear too. Most camping gear isn’t built for use day after day after day. Getting your gear right is going to be an ongoing challenge.

That’s all I can think of for now. I’m sure a thousand more ideas will come back to me but at the moment I can’t think of any.
Good luck and get ready for an awesome time! You don’t need an RV to go full time!!!

_2. Re: full-time tent living…anyone doing it?
Another area I thought of that might be helpful is with water storage. I realize you said that you will stay in campgrounds, but even there you can get some pretty bad tasting well water or you might be 100 feet from the spigot. You might want to think out a good water system.

Here’s what I do to give you an idea. I carry two 5-gallon Reliance water jugs. These weight about 35 pounds each when full. I also carry a several MSR Dromedary bags in the 10 liter size (10 liters is about 2.5 gallons). These store flat when not in use. I also carry an MSR Miniworks EX water filter. With this system I can stay quite a few days in dry areas or indefinitely in wet areas.

I also own a Berkey water filter which makes the best tasting water in my opinion. Even if you camp in campgrounds, you might want to look into getting a Berkey system to clean up all that sulfur and iron taste that a lot of campgrounds have. It will flat out turn ditch water into pure good tasting water better than any other filter I’ve used.
I also carry a 50 ft drinking water hose. Make sure you get one that is for drinking water – not a green garden hose.

_3. Re: full-time tent living…anyone doing it?
If I had it to do over again, I’d get two 25′ hoses. A lot of places, 25′ is enough and there would be less hose to clean and coil up on the last day but you’d still have that other 25 footer in case you need a longer run.

I haven’t looked into putting a filter on the hose. Most of the hose use for me is for washing gear, showering, washing hands, etc. and doesn’t need to be filtered. Only the cooking and drinking water needs to be filtered which is only a couple gallons a day. A good filter, like a Berkey, is not cheap so I only use it to purify the water for cooking and drinking and try to preserve the filter as long as possible.

_4. Re: full-time tent living…anyone doing it?
Our setup so far:
•  9×12 kodiak canvas tent,
•  separate shade canopy,
•  several tarps for both ground cloth and rain fly/shade
•  coleman 2 burner propane stove—several small propane cylinders/ 1–20# cylinder
•  Reliance 4 gal. beverage buddy,
•  6–1gal. water bottles/jugs, all refillable
•  for sleeping: a cot and sleeping bag, extra blankets, etc for housemate
•  I am using for the time being an air mattress, with a 3 inch foam mattress-(due to joint problems) on top of that,
•  emergency blanket between the layers, sleeping bag with fleece insert and a few extra lightweight blankets if needed…haven’t found a cot that’s comfortable for me yet…I’m picky…
•  we’re also bringing a box fan,
•  oil filled radiator type heater for chilly nights, when needed…
•  cast iron cookware, general cooking utensils/enamelware dishes, etc.
•  2 mid-sized coolers (lighter weight for us to carry),
•  round cooler for drinks(can double for water storage, if needed)
•  solar powered lantern,
•  NOAA radio (multi-function),
•  a couple of solar-powered yard lights,
•  couple of flashlights
•  personal gear (clothes/summer/winter) shoes/boots etc…
•  Still need to get some water hoses/filters, and a shower setup… have a luggable loo already.

If all goes according to plan, we should be starting this adventure sometime in October, camping in So. Texas, then maybe into New Mexico or Arizona during the winter, then work our way to Tennessee come spring…can’t wait to get started…

 DSCF7165

Leave a comment

Filed under Survival Manual, __4. Shelter Issues

Emergency shelter

(Survival manual/ 4. Shelter issues/Emergency shelter)

 Building a Survival Shelter
There are many books and DVDs on survival and most of them cover the survival shelter. God forbid that you’ve ever in an emergency situation requiring you to survive in one. What follows is a visual listing of several potentially life saving shelters, going from a true emergency to the garden shed- cabin concept.

Poncho shelters

Primitive Lean-to Shelter
The lean-to  is the simplest and fastest Survival Shelter to build.
You will need a horizontal branch which can be tied between two trees or supported by two branches crossed over. Then branches are leaned against the wind side to create an angled roof. The roof can than be covered with branches, grass, leaves or moss.
This one is usually found near a survival cache. It’s a spot where all the basics are covered like shelter, weapons, 3 days worth of food, and water gathering materials. You make this camp in preparation of moving to a better more permanent location soon.  They are great for those of us that like being
able to Bug Out quickly without a second thought.
•  Advantages: Very quick to set up,  easily hidden, cheap.
•  Disadvantages: temporary, not easily defended, limited supplies.

Debris Hut
A debris hut is a good option when in search of warmth and it is also easy to construct.
1)  It is built by constructing a simple tripod using two short stakes and one long “ridgepole,” a sturdy pole which  runs down the length of the shelter.
2 )  Large sticks are then propped up along the length of the ridgepole. This is the shelters “ribbing.”
3)  Next, in a way similar to the building of the vertical ribbing, smaller sticks are placed horizontally to make a criss-crossed pattern or latticework. This latticework will support the insulating materials.
4)  After insulating materials (leaves, grass, etc.) are collected, they are laid over the construction until the layer is one to two meters thick. Thicker for more insulation.
5)  The floor is then covered with a 12 inch layer of the material.
6) Then a pile of material is placed near the doorway. This pile is to  be dragged to the door in order to “shut” the door. Finally, the “ribbing” step is then repeated to hold the insulation material in place.

Once again in brief: To build a debris shelter you will need a sturdy ridge-pole this will need to be propped on a sturdy log or rock, When the ridge-pole is in place, you will need to place sticks close together along both sides at an angle, leaving an opening for a door. At this stage, it will look like a backbone with ribs. Cover the roof with branches, grass, leaves or moss. For inner insulation you will need to find the softest, driest debris  possible. Pad it out top to bottom, go inside and compress it. This Survival Shelter will keep you warm if done properly.

[Photo above: Literally, a “debris hut”, but one which works in an emergency situation.]

.

Pallet house #1
 The average life of a Refugee camp is 7 years, with some camps maintaining residency over 50 years. There is a need for an alternative shelter to the typical tent solution that can transform a temporary living condition into a permanent home.

Pallet House by I-Beam Design, was conceived as a transitional shelter for returning Refugees. It’s a good looking house, especially for a pallet house.

.
Pallet house #2
The floor is made from pallets with slates abutted to each other. Can be set on a stone foundation to keep  the wood off the ground. A simple 16 by 16 foot shelter can be created with 100 pallets.
[Picture at right: A more ambitious pallet house with an interior wall. Exterior can be covered with plastic sheets, tin, or thin plywood.]

Simple building designs that can be quickly and easily erected with common materials are becoming more and more essential as climate change and population growth push the limits of traditional building. Quick, affordable and sturdy housing will only be more in demand in the coming years, so ideas like the Pallet House can be invaluable for destabilized communities.
<http://inhabitat.com/eco-emergency-shelter-built-entirely-from-shipping-pallets/#ixzz1HieyoyL0&gt;

Micro Shelter
http://relaxshax.wordpress.com/2011/02/18/

A mini/micro shelter designed as a tiny, easy to build “escape cube” (for indoors or out), and/or a super-affordable short-term shelter for the homeless or for hikers/travelers, etc. Total cost: Approx. $100-$110. It’s a mere 16 square feet inside, but “roomier” than you might think, for something mainly built out of two sheets of plywood. [For an emergency or remote camp where such a structure could be prepositioned, the concept of the above microshelter is as expedient as it is inexpensive. Made with full 8 feet long sheets of plywood it would provide a much larger, almost solid structure to sleep or escape into in the advent of inclement weather.]
The shelter also could be put on an elevated platform for security from some wildlife, or cranked up into a tree with a come- along; even mounted on a utility trailer frame and filled with other camping or emergency supplies for vacation or ‘bugging out’. The beauty of this shelter is that it can be built in under a day, by someone with very little building experience.  Build it yourself.
.

Ideas for a precut garden shed/ emergency shelter/ cabin
Lets say the basic structure will be a common wood product garden shed as seen below, including a view from the outside and inside. You might want to have an extra, optional window installed for cross ventilation (2 windows minimum). These sheds are commonly sold by Home Depot and Lowe’s and can be bought as a kit or  professionally constructed on site.
 

Exterior additions
By adding a lean-to roof to the shed, you have an outdoor ‘porch’ or workspace;  by enclosing the lean-to roof, the space becomes a shed or an additional room. Solar panels could be installed on the roof to maintain a 2-4  sealed, deep cycle battery electric storage capacity, with which to charge your personal electronics (cell phones, Ipod, iPad, CD player, portable DVD player), a fan, lap top computer and for night time illumination.


Once you see and can imagine everyday furnishings set in a garden shed and begin to think about electrifying that small space, the livability of such a common enclosure becomes evident.
An 8’x12′ or 10’x16′ gargen shed could easily become a comfortable, interm emergency dwelling.

Add preparedness functionality with:
Coleman stove set under window, several wash basins, Big Berky water filter, rain barrel, shed roof gutters, small wood burning stove with chimney or catalytic heater and appropriate size propane tank, bunk bed style camp cots, folding leaf table and chairs, porta-pottie, solar panel-battery storage, fan, 12 volt interior lighting, Zeer pot refrigerator, chest of drawers, overhead storage below rafters, outdoor clothes line….

With this concept in mind, all that you would need for ‘long’ term survival situation (this is not a complete list, but is a very good start) would be some cash, a bag of pre 1965 silver coins, a galvanized trash can filled with dry goods, another filled with canned foods, a stack of boxes of freeze dried and dehydrated foods, a solar oven, 1-2 sanitary fifty gallon drums of water with rainwater catchment or  several gallons of household bleach disinfectant, sleeping bags, cold and warm weather clothing (ie shorts, wide brim hat, long johns, hoodie, coat) some rat traps and conibear traps, a .22LR rifle and 12 gauge shotgun and  medications. The items in this last paragraph are- or will be, discussed in greater detail else where in Survival Manual, see the Categories or look under the Survival Manual tab at the top of the 4dtraveler home page.

Actual living conditions. What people have done, or are doing now…
In an emergency you CAN live in ‘small’ and you can probably do better than  much of what follows, below:

Russell Lee Home Sweet Hovel December 1936. “Mrs.Charles Benning sweeping steps of shack in Shantytown. Spencer, Iowa”

A temporary shelter packed in to a remote area piece meal, undergoing construction.

Leave a comment

Filed under Survival Manual, __4. Shelter Issues

Trash and Human Waste disposal

(Survival manual/4. Shelter issues/Trash and human waste disposal)

Unsanitation is coming and it may be closer than you think.
If you don’t properly dispose of your trash, within a couple weeks after SHTF, what you see here will be what you, your neighborhood and city will be faced with.
(Picture at left: A beautiful spring day in May 2008, Naples, Italy, one spot in one neighborhood, after 5 months without city garbage pick up – the city landfill was filled to capacity and closed.) tomlucier.wordpress.com/tag/waste/

A.  City drowning in rubbish: 10,000 TONS of waste pile up on streets of Marseilles in chilling echo of British ‘winter of discontent’
26th October 2010, By Peter Allen.
Pasted from:http://www.dailymail.co.uk/news/article-1323500/France-strikes-10-000-TONS-waste-pile-streets-Marseilles.html#ixzz1PvOSMidj
“Nearly 10,000 tons of rubbish has piled up in the streets of Marseilles as French strikes and blockades continued. All of the country’s 12 oil refineries remained closed today after nearly two weeks of industrial action which is costing the country up to £350 million a day.
During the disruption French President Nicolas Sarkozy’s opinion poll ratings have collapsed and he is now the least popular leader in the history of the Fifth Republic.
Demonstrators restored their blockade at France’s biggest refinery of Fos-sur-Mer, Marseilles, following last week’s clearing of their demonstration by CRS riot police.  ‘The refinery is back in our hands – the police are standing off,’ said a local trade union spokesman.
Around 70 ships including oil tankers are currently waiting at anchor off the coast of Marseille because militants will not let them dock and unload.
Up to a quarter of 12,500 fuel stations have run dry, with rationing introduced in area which are particularly popular with visitors from the UK, including Brittany and Normandy.
A Transport ministry spokeswoman said: ‘In the west of the country and in Paris more than a third of filling stations have been shut down – the situation is extremely serious.’
Nicolas Sarkozy scored a victory on Friday by getting his bill to make people work two more years for their pensions through the Senate, but striking refinery workers are putting a strain on businesses and daily life and show no sign of backing down…

Photographs above: Left: Marseille, France has been crippled by strikers. A fleet of huge ships  cruises offshore, unable to dock, their lights reflecting against the still  waters of the port at night. From the air it looks like a giant game of  Battleships.
Right: In the city centre, streets are still piled high with rubbish after the  refuse collectors joined dock workers, train drivers, students and airport staff who have brought the city almost to a standstill.


Photographs above: Scenes of New York City trash build up during and following an early  January 2011 winter storm. Sanitation becomes a problem immediately following even  a common, brief weather shut down. Imagine a situation that closed down  garbage and waste  removal for weeks – or months.

Meanwhile a resident in Philadelphia writes:
“You’ll be thrilled to know that I made it into work in less than 50 minutes this morning, and I didn’t need to drive ‘the 30 Blocks of Squalor’. But, I still needed to maneuver through West Philly
around the Zoo. I’m not quite sure but I believe Monday is trash day in West Philly based on the size of the garbage bags piled high in front of the ‘tenements’ and hovels. I was just happy there was no snow on the streets from the snowstorm one week ago. It seems that the new Phila snow removal program is
working wonders. Wait until the temperature goes up to 50 and the snow melts.
What struck me was how much trash and garbage was generated in such tiny row homes by people with a median household incomes of $21,000. The median value of houses in this war zone is $30,000. I’m mentally picturing the inside of these houses.
The question I have is what did these people use to purchase enough crap to generate this amount of garbage? These are the poorest of the poor in our nation and they are generating twice as much garbage as my family. In a three block stretch, there were more newer model $30,000 cars than there are in my entire upper middle class neighborhood. My driveway has an 11-year-old minivan and a 9-year-old CRV in it. What gives? They are not buying shit with wages, because 50% of the people in this neighborhood don’t work. The only thing I can think is a combination of government handouts, illegal activities, and credit cards…”

  BTrash disposal in an emergency situation
For urban dwellers: If everything is seriously messed up after the SHTF and major state functions fail like water, garbage, power, etc, then you may  need to take cover when going about business outdoors. Night disposal runs are best in two man teams. Foot travel to alternate trash dumping locations a few blocks away in the moonlight will be safer than day traffic. Avoid driving, save your fuel for more important events.
Compost all organic material, recycle all plastic, glass, metal, and wood to the best of your ability. The remaining refuse should be discarded as soon as you can to prevent disease / illness, also reduces odors.

 Incinerate the burnable rubbish, along with the plastics.
Organics get composted.  Burnables, we burn.  That probably sounds like heresy if you live in a city, and I confess I had to get used to it myself.  Hadn’t seen a burning barrel in years.  But yeah, burn’em.  Glass jars get re-used; they’re valuable.
That leaves tin cans, beer bottles and non-flammable  construction or demolition trash.  Haven’t found a self-sufficient answer for that one, so I haul it to the landfill.  If ever the day came when that was no longer practical, and I was generating that much trash, I’d contract with a neighbor who has a backhoe and make my own landfill.  I’d really hate to do that, though.
[Steel drums last about a year each, depending on how wet they become inside from rain and snow. Set the drum on a couple of concrete blocks to get it off the ground which will make the can last longer. In order to get the best combustion and the least amount of residual ash, make several dime size ventilation holes around the can’s lower periphery and up the sides. Use a steel chisel, drill or a few bullets more powerful than 22LR. Put a steel lid  on the can between burnings, to keep rain  or snow out of the ash. Wet ash accelerates rusting on the inside of the can. When the can is about 1-2 to 2/3 full it’s time to empty. If your moving the contents to another spot (and hopefully you are), have a wheel barrow handy to tote the can and contents. Dump the can upside down and bang the bottom to dislodge compacted materials then return the can to its ‘home’.

Compost to get rid of your bio-degradable materials 
Select an area for your compost pile or bin. Look for a spot that gets a lot of sunlight and has nearby access to water. Make sure the location is close to the house for convenience, but not so close that decaying organics can be smelled inside. [I had one 100 feet away for 30 years and never
smelled it, even while standing outdoors beside the house.-Mr. Larry]
Efficient decomposition requires nitrogen (kitchen scraps), carbon (yard waste), oxygen (air), and water. Collect kitchen and household scraps for the compost pile. Useful items include:
•  Fruit and vegetable scraps
•  Coffee grounds and tea leaves
•  Eggshells (rinsed of whites and yolks)
•  Shredded newspaper (not magazines)
•  Fireplace ashes
•  Sawdust

Do not compost meat, bones, fat, grease, dairy products, or pet waste. [I composted all the preceding except pet waste . The compost pile and garden loved me for it, but the larger bones don’t break down]
TIP: For more efficient composting, cut large scraps into smaller pieces.
TIP: Use a carbon-charcoal filter container to collect household scraps. The filter eliminates odors
[For many years, we used a 4-5 quart, covered, plastic ice cream pail to store our miscellaneous daily
household scraps and dumped the pail when it was full.-Mr. Larry].

  1. When the collection container is nearly full, empty the scraps to the compost bin or pile.
  2. Add a layer of leaves, grass clippings, and/or weeds from your yard. If not available, add straw.
  3. Moisten and mix the compost pile every few weeks. Water the pile, then use a pitchfork or shovel to turn the compost so that oxygen reaches all ingredients to encourage decomposition.

TIP: To make sure there is sufficient moisture, examine a clump of the material.  It should be damp, but not soggy and drippy.

  1. Adjust the proportion of compost ingredients by odor. The compost should have a good earthy smell. If the compost has an ammonia odor, add more carbon materials such as leaves and
    newspaper. If the compost smells foul, it is probably too wet and needs more dry materials such as leaves or straw.
  2. Allow the compost materials to decompose before use. It should feel crumbly, look dark, and smell earthy.
    The process typically takes a few months, depending on ingredients. Do not use compost before it’s ready—the decomposing ingredients can attract pests.
  3. In a SHTF scenario: Never put any trash near your house to avoid letting people know you
    have food. All trash which can be burned will be for fuel. Cans which cannot be reused will be crushed and buried away from the house. If water was not an issue, would wash them out to use for other purposes. If water was short they get thrown out to avoid attracting pests and guests.

This pair of compost bins were  made from 8 pallets, one pallet down the middle, and stripped boards off the 8th pallet to hold it all together. Throw kitchen scraps, some grass clippings, manure, little screened loam, leaves and other misc. “brown” material like small  twigs, rotting wood, etc. Then I leave it. Turn the compost probably 3 times next year, once in the spring, mid-summer and again next fall. Then use it in  Garden the following year. Pallets are awesome. They’re free and can be used
for all sorts of things.
[I used pressure treated rough sawn 1” x 8” pressure treated planks, they definitely looked nicer, but n a pinch the pallets would work.- Mr. Larry]

Build or purchase compost bins. A small fenced area with no bottom allows worms, soil bacteria, beetles and other beneficial organisms to work and aerate the compost. L>R: Steel post & chicken wire; circular, made with common wire fence; divided square bins made from wood slats and chicken wire.
[My bins looked similar to the wooden slat bin at right, except it was about 3 times larger and made from rough sawn pressure treated planks.

.

B.   Human waste disposal
Sanitation is a dirty subject that no one really wants to talk about.  But it is an often overlooked aspect of emergency preparedness.  When a disaster creates a situation where the water sources are compromised, the lack of sanitation in the given disaster area will be a disaster in itself.  A 50 mile radius of individuals could be affected by illness and disease.  Prepare appropriately for this aspect of disasters in order to prevent the spread of communicable diseases.

 Add a Sanitation Kit to Disaster Supplies
Photo at right: A confined, rolling method of moving several dozen, sealed plastic trash  bags containing human waste to a remote site –  away from your shelter.

Having a sanitation kit that is ‘ready for use’ in times of disaster is essential to keeping your family and neighbors healthy.  These kits can fit comfortably into a bucket, are affordable, and will not take up much space.  Additionally, being educated on how to properly dispose of waste is a key factor in keeping everyone healthy during a disaster.

Some suggested sanitation supplies to add to any short or long-term emergency kits are:
•  Port-a-pottie, disposable 5-6 gallon paint bucket with lid, ‘luggable loo’ with seat
•  Toilet paper
•  Rubber gloves
•  Garbage bags with twist ties ( for liners of toilets or luggable loo)
•  Bathroom cleaner, Clorox, small bowl with water-disinfectant for washing hands where there
is no running water.
•  Cat Litter or absorbent material such as saw dust or dirt
•  Baby wipes, sanitary hand towels.
•  Baking soda can be used to help eliminate odors, lime
•  Vinegar
•  Shovel

Image at right is a Short term Family Toilet Sanitation Kit, containing: 1) Double Doodie toilet waste bags (or a medium-sized plastic bucket, 5-6 gallon, lined with a heavy-duty garbage bags); 2) toilet paper (for a family you’ll definitely want more than 4 rolls for anything longer than a few days business); 3) Basics Antibacterial bath wipes (or Handi-wipes, Wet Ones, etc); 4) small bottle Aqua Chem, port-a-pottie deodorant, or RV toilet deodorant; 5) toothbrush with paste. Determine quantities from your disaster preparedness scenario.

Additional ideas:
Have several buckets with lids to store stuff up while I wait to dump them. The lids are to help control smell. Human waste will be buried away from the house.
Keep a 80 lb bag of common industrial grade powdered lime on hand.

•  We evolved to live in small bands, and move on to a new location every week or so. The further you get from that lifestyle, you’re going to need fancier and fancier engineering. A trench latrine works for campers. Leave the TP roll on the shovel handle, and throw some dirt in the trench to cover your deposit, thanks.
•  Sharing a toilet seat means you get as sick as the sickest person that uses the same throne. It’s literally like dropping ‘trou’ and bumping butts with everyone else in your group, several times a day. Lysol is a must.
•  If you are in a suburb or city, first use the toilets you already have. You can take the lid off the water
closet and add more by hand. Use any water, like after a rain, or dishwater, whatever. Toilets don’t need electricity to flush, just water in the tank. Your public sewer lines might work for a week or two before they stop up. Use the time well!
•  After that, or where you don’t have the spare water, line a bucket with a heavy trash bag, and take the seat off of a toilet, and use that. Throw the full bag in a city trash can or dumpster. It will help with the smell, and if authority comes to clean up, that is where they will empty first. You can burn the dumpster or can if you get desperate.
•  If you compost with animal or human excrement, watch out for hookworm and ringworm, which can migrate and infect plants like tomato and corn via compost. This is also especially true of dysentery, the leading cause of death in Latin America. In Africa, blood flukes are a major health hazard from this, and from people working in irrigation ditches that are waste deep, then flowing onto fields.

Photos above: Left: Drain water from you home toilet and line bowl with plastic trash bags,  remove as
necessary. Center: 5-6 gallon portable toilet, used with trash bag liners. Right: Port-a-potti style toilet with minimal flush capability, deodorant in tank, empty every day or two.

Emergency Sanitation

The images above are common, modern camp gear – toilet/shower privacy enclosures. In a really bad situation, few things will provide your accustomed comfort as the personal privacy of an emergency bathroom’.
https://preparednesspro.wordpress.com/tag/garbage-bags/
.

C.  Emergency Sanitation
27 July 2009, preparednesspro.wordpress.com, by Kellene Bishop
 Sanitation is one of the ten critical components of emergency preparedness. It is usually one of the top two that are most overlooked. A lot of us take emergency sanitation for granted until our toilet breaks down or the sewer backs up. Keep in mind, if there is a quarantine, who’s going to maintain the proper working order of the sewage services? If there’s a financial collapse, how will we even have the wherewithal to send our waste somewhere else? If you don’t take emergency sanitation seriously, then the consequences can be extremely dire—even up to a 50 mile radius. Preventing waste from
contaminating the soil is just as important as preventing the spread of any other disease, as it contaminates crops, water, and air. Additionally, as water will be scarce in a time of emergency, ensuring that it does not get contaminated from improper sanitation habits is critical.

High amounts of hydrogen sulfide results from human waste. It not only smells horrible, but can also be very dangerous if a great deal of build-up occurs locally. Flies, rodents, and other unwelcome “guests” are attracted to the smell of fecal matter. Flies actually consume it.
Unfortunately, this also means that human waste is speedily spread to humans via flies and rodents to multiple locations and can subsequently effect an entire community with a sanitation disaster within 48 hours. Thus ensuring that your toilets are covered and you have the ability to break down the waste is critical in order to ensure the best health in a stressful circumstance.

Your first line of defense for emergency sanitation will still be the toilet in your own home—for a little while at least. You may only have enough time to build an alternative source, but you should at least have some time to implement these initial strategies. So long as you have water supply, flush conservatively.
When you aren’t able to flush any longer, plan on pouring water down the toilet to get rid of the waste. (Think how fast you’ll be using that water folks. Now do you start to see why I say a gallon per person, per day is the minimum amount you want to store? Although, keep in mind, you can use dish water, laundry water, or leftover cooking water for this purpose.) After you no longer have this option, plan on using the toilet as more of a “bucket.” Turn off all of the water to the toilet, and then plug it up with a tennis ball to ensure that no sewage comes through. Then line your toilet with a bio-degradable, compostable bag.
When you’ve exhausted the use of that bag, seal it, and then bury it so it will decompose properly.

In the eventual likelihood that you will have to move your “outhouse” outdoors, there are several additional considerations for emergency sanitation. Obviously, you want to keep it away from any food or water supply.
But you will want to be sure that you have chlorinated lime or bleach on hand to chemically and safely break down the waste matter. (Note: Powdered, chlorinated lime is available at building supply stores and it can be used dry. Be sure to get chlorinated lime and not quick lime, which is highly alkaline and corrosive.)

Every single time a person uses the toilet, some type of disinfectant should be sprinkled on top. It can be chlorinated lime, bleach, or even some other household disinfectants such as Pinesol, Lysol Cleaner, Arm & Hammer cleaners, plain baking soda, laundry detergent, etc.

.

D.  What To Do When the Sanitation Hits The Fan
22 December 2010, ReadyNutrition.com, by Tess Pennington
Excerpts pasted from: http://readynutrition.com/resources/what-to-do-when-the-sanitation-hits-the-fan_22122010/

Cathole considerations:
When choosing a site to bury waste:
•  Select a cathole site far from water sources, 200 feet (approximately 70 adult paces) is the recommended range.
•  Select an inconspicuous site untraveled by people.  Examples of cathole sites include thick undergrowth, near downed timber, or on gentle hillsides.
•  If camping with a group or if camping in the same place for more than one night, disperse the catholes over a wide area; don’t go to the same place twice.
•  Try to find a site with deep organic soil.  This organic material contains organisms which will help decompose the feces. (organic soil is usually dark and rich in color.)  Refer to the jars used to demonstrate decomposition.  The desert does not have as much organic soil as a forested area.
•  If possible, locate our cat hole where it will receive maximum sunlight.  The heat from
the sun will aid the decomposition.
•  Choose an elevated site where water would not normally runoff during rain storms.  The idea here is to keep the feces out of water. Overtime, the decomposing feces will percolate into the soil before
reaching water sources.

Disposal of Feminine Napkins
It is important to properly dispose of sanitary napkins, as they contain bodily fluid that could pose a health hazard to others. Methods of disposal may differ according to where you are and what you have available.  However, tampons and feminine napkins do not decompose quickly.  Therefore, the best way to dispose of used feminine napkins tampons is to burn them. The fire must be very hot in order to thoroughly destroy the used items.

Sanitation will require the same type of  supplies for a short-term as a long-term disaster, however, a more permanent structure needs to be in place for long-term use.

Leave a comment

Filed under Survival Manual, __4. Shelter Issues

Washing laundry (during an emergency)

(Survival manual/4. Shelter issues/Washing laundry)

Water and Wastewater quality
<
http://goeastyoungwoman.wordpress.com/2009/05/05/how-to-do-laundry-by-hand-country-style/>
The effectiveness of your City’s Water and Wastewater Treatment Plants may be undermined during a high mortality pandemic or other local/regional disaster.
Current plans for antiviral and antibiotic use during a severe influenza pandemic could reduce wastewater treatment effectiveness prior to discharge into receiving rivers, resulting in deteriorating quality at drinking water abstraction points.
The research team concluded that, consistent with expectations, a mild pandemic (as in 2009) was projected to exhibit a negligible ecotoxicologic hazard. However in a moderate and severe pandemic nearly all Water and Wastewater Treatment Plants (80-100%) were projected to exceed the threshold for microbial growth inhibition, potentially reducing the capacity of the plant to treat water. In addition, a proportion (5-40%) of the River Thames was similarly projected to exceed key thresholds for environmental toxicity, resulting in potential contamination and eutrophication at drinking water abstraction points.

WASHING LAUNDRY

A.  How to do laundry by  hand, country-style,  #1
WordPress, Published May 5, 2009
<http://goeastyoungwoman.wordpress.com/2009/05/05/how-to-do-laundry-by-hand-country-style/>
“You can get a big tub and do your laundry by hand!” the Thai owners of my building announced happily when I asked them if there were any washing machines I could use, or some kind of laundry service.
Me: “Um….ok….um…how would I do that, exactly?”
I’ve washed one or two things out by hand in the sink, but any kind of large-scale laundry-washing endeavor has involved, WASHING MACHINES. But washing machines are actually rare here, especially the real, modern kind so hand-washing everything is pretty common.
Of course, any place poor enough for laundry machines to be a novelty probably has lots of people I could pay to do my laundry. However, I like doing chores myself. Also, while it’s easy to pay people to do stuff for you in Thailand, it can be quite hard to get things done the way you want — so in most cases it’s a lot simpler to do it yourself.

 Here’s how you wash laundry by hand:
1.  You need a big laundry tub, about 3 feet wide a laundry brush, and of course detergent. If you’re a princess like me, you need rubber gloves too. The giant tub is important, it really doesn’t work well to do a lot of laundry in your sink.
2.  Put water and detergent in the tub, then the laundry. Make sure everything is wet, then let it soak for 1/2 hour.
3.  Using the laundry brush, take each item of clothing and inspect it for stains, and give it a good scrub with the brush.
4.  Drain the water, and put in new, clean water.
5. Let stuff soak a little bit more.
6. Drain water, and twist out the water from each item. Once you have to twist out a towel or jeans, you will have a newfound appreciation for centrifugal force!
7. Hang each item on a hanger and put it out in the sun. In Thailand, where temperatures reach 104ºF, no one except hotels own dryers: it takes about an hour for clothes to dry in the afternoon sun.
.

B. Another way to wash by hand
1.  Heat the water in one of the tubs over a hot fire.
2.  Set the other two tubs up on blocks or a tree stump side by side
10-15 feet away from the fire.
3.  Make certain all tubs are secure.
4.  Fill one tub with boiling water, adding enough cold water to make it tolerable for your hands.
5.  Add a few white clothes to the wash water.
6.  Put the washboard in the tub and rub the surface with a bar of soap.
7.  Take a piece of laundry out of the water, lay it the length of and on top of the wash board. Rub soap on material.
8.  With the edge of the material held in your hand between thumb and fingers, begin to rub up and down the board with the heel of your hand, gathering and pulling the material toward you.
9.  Push the material down in the water and start from the beginning.
10.  Scrub each garment vigorously four to eight times.
11.  Dip into water, rinse, wring out water and put in next tub filled with warm rinse water.
12.  Rinse in second water, wring dry, and hang on clothesline.
.

C.  How to wash laundry by hand #3
<http://www.ehow.com/how_4468545_wash-laundry-hand.html#ixzz1HXZMGk5Z>
If you are like me, you are always searching for ways to help the environment, get back to basics, and do things by hand. Well, washing your laundry by hand is a great way to start. This article can help you learn all of the different method you can use to wash your clothes by hand, and places to find the equipment you will need to get started.

Decide on how you are going to wash your clothes. Here are some of the way available.
You can use a simple basin and washboard. This method is cheap and effective. You simply apply the lye soap to the wet laundry, and scrub with a laundry brush against the washboard. You will probably need another basin with clean water to rinse your laundry.
Another option is to use a Rapid Washer. This is shaped like a plunger and used in about the same way. It really kicks out the dirt and grime.
If you really want to make a commitment to washing your clothes and laundry by hand, I would invest in a Lehman’s Hand Washer. It has a pivoting arm that really get the clothes clean, in only about 7 minutes per load! It is a more expensive option, but well worth it.
You will want to wring out your laundry before hanging it up to dry. This is a wringer, which can attach to your hand washer or to your basin. Simply wring the items of laundry through the wringer and it is ready to hang.
After your clothes are wrung out and ready to hang, you will want to put them up on a clothesline. You will also want to buy a lot of clothespins. String your line up between two trees, between your fence and your house, or on a free-standing unit.
Congratulations! You can now wash your clothes and laundry by hand!
.

D.  Laundry When the Wash Machine’s Out
<http://www.shtfinfo.com/shtffiles/how_to/Laundry_Without_Wash_Machine.pdf>
This article will explain a couple of ways to do laundry when there is no wash machine handy. Why would we want to know this? There are several times in a survivalist’s life when he may find himself without a wash machine. The most common one would be while camping. We will look at this first.
I cannot claim to have discovered this technique, but I can tell you from experience that it works. I found it in one of “Ranger Rick” Tscherne’s Ranger Digests. For as long as I can remember, I’ve never packed more than one spare change of clothing in any backpack I’ve ever put up; whether it be for going to the field or as a BOB.  This is because I’ve always included two things that more than make up for the weight: a G.I. waterproof bag and a Ziploc full of laundry detergent. The waterproof bag has about two-dozen uses in the field, but in our case, we’re going to turn it into a hand-powered wash machine with agitating action.

1. Put one set of clothes-one shirt, one pair of trousers, a t-shirt, pair of socks and drawers-in the bag. To prolong the life of the bag, turn the pants inside out-if they’re BDUs, the metal take-up tabs on the sides will scratch the bag, and the buttons on blue jeans will do the same
2. Pour a quart (one canteen’s worth) of cold water into the bag, along with a mess-kit spoon’s worth of laundry soap. You can throw in a couple of SMOOTH river rocks if you have them, but this is not critical.
3. Close the bag up partway and squeeze most of the air out.
4. Finish closing the bag in the form of a “gooseneck” (instructions are printed on the side of the bag).
5. Squeeze, roll, mangle and toss the bag around for about five minutes. Really work the thing. You’ll hear it squish and squash. This is just what you want to happen.
6. Open the bag, wring out the clothes, pour in another quart of water, and repeat steps 1 through 5 until laundry is clean (may take two or three rinses).
7. Line-dry as you would normally. To get it to dry faster and avoid wrinkles, make sure your laundry is spread out as smoothly on the line as you can. I thread the line through the sleeves of BDU jackets and t-shirts; this seems to help.

Now suppose we’re at home, and there’s no power. Or, as was my case, suppose you find yourself “in between jobs” for a spell and really don’t want to waste money running the wash machine or going to the Laundromat? You still need clean clothes, as much from the standpoint of good morale as for hygiene’s sake (who wants to put on skuzzy old clothes after washing up?).

Anything you can throw in the wash machine can be hand washed. One of the best money-saving investments you can make is to go and buy an old-fashioned washboard and a drying rack. Washboards cost maybe $15.00 or so, last time I checked, and I bought a folding wood drying rack for about $5.00 at Wal-Mart. If you have a small, non-chain hardware store in your community, it’s a safe bet they’ll sell washboards. The Dollar Store may as well-you just might get lucky. Mine have paid for themselves many times over. If you have a large mop bucket, use it. Mop buckets use less water, and the washboard sits in there better than if you only use the bathtub.

Hand washing has one other advantage; namely, you can get really hard-to-clean clothes cleaner washing them by hand than any machine will do.
Start by “pre-treating” any really heavily soiled clothes. I work outdoors, and my blue jeans get filthy. No wash machine ever made has got the knees or the seam near the hems completely clean. Instead, I take a bristle brush and some cheap shampoo, dribble the latter on the problem area, and scrub the daylights out of it with the brush. They’ll fade more than in a washer, but that’s bound to happen anyway.
You can use the cheap shampoo trick right now, while you’re still using a wash machine. Just pre-treat stains and soils with some shampoo instead of the more expensive stuff, which is really only shampoo without the fragrance. It works wonders on grease and oils.

Procedure
1.  To use a washboard, sit it in the bucket with about a gallon of water. Have a clean place to put clothes that have been washed-I use the bathtub. You can either use normal laundry soap or, if you really want to save money, use a bar of yellow Fels-Naptha brand soap. It’s a cake of soap that’s harder and slightly larger than normal bath soap bars. It costs around $2.00 or so and lasts for about seven or eight small loads of laundry.
2.  Take one piece of laundry, dunk it in the water, and lay it against the washboard. You don’t have to lay all of it against the washboard, just one part at a time. Rub the bar of soap against the clothing-it’ll be hard and will crumble a bit when it’s new or dry, but will be easier to work with after a while. Then just pretend you’re cleaning the washboard with the clothing. It’s a thing more easily done than described, but cleaning clothes like this is pretty intuitive, and you’ll get the hang of just how to do it in no time.
3.  You’ll also find that, after a while, the water gets pretty soapy, and that you may not need to rub the soap on the clothing at all. For clothes that aren’t soiled so much as “funky,” you may only need to squish them around in your hands for a while.
4.  After all your clothes have been washed, it’s time to rinse. This calls for a LOT of water, but the water doesn’t have to be drinkable, only clean. I’ve found that it usually takes two good rinsings to get the dirt and soap out. Wringing as much as possible out beforehand will save water.
Fill the bathtub with half of the water you intend to use (anywhere from three to six gallons is about right, depending on the size of the load). Swish and swirl the clothing around with your hands. You must make sure to get the soap out of the places you scrubbed it in, and this may take some elbow-grease. By the way, if you haven’t noticed, this is an awesome workout for the muscles of the hands, wrists and forearms!
5.  After you’re done rinsing, wring the clothes out and either line-dry them or hang them on a drying rack indoors. If you have a heat source, put the rack near it. An open window with a breeze wafting through will also help to dry things quicker. Remember again to lay things as flat as possible, or you’ll get wrinkles. Now it’s just a matter of time.

White bed linens, drawers and so forth should be bleached. What’s more, these articles can stand boiling water. Unless you have a huge cauldron on a wood-fire outside, you’ll just have to use the hottest water you can get. Linens and clothing used in caring for the sick should certainly be bleached and boiled if possible, but in any case bleached. Use household rubber gloves if you don’t want your hands looking and feeling like a concrete worker’s. If not directly soiled, whites can be swirled around in bleachy/soapy water in the tub with a wooden stick.

I’ve read one suggestion that has some merit to it, although I admit I’ve never tried it. A lady whom I hold in rather high regard made a sort of washer out of a 5-gallon bucket with lid, a plumber’s plunger and a ring washer similar to that used for protecting the wiring that goes through the firewall of a car. She bored a hole in the lid, fitted the washer through, and put the plunger inside. It looks like a butter churn would if they were made of plastic. As I said, I haven’t tried this, but there seems no reason why it shouldn’t work.

Woolens don’t necessarily need to be dry cleaned. Sweaters, blankets and such can be washed with Woolite, according to the instructions on the bottle. They should not be wrung or twisted, but rather laid flat and dried. It’ll take a good long while, but that’s what you pay to get wool’s other benefits.
One final tip. If you use Fels-Naptha soap, make sure to put it in a soap dish or something that’ll let it dry out. If you let it stay soggy, it’ll turn to mush and you’ll end up wasting most of it.
Washing things by hand is pretty simple, and it’s also really inexpensive. It also gets clothes cleaner than they would if you’d washed them in a machine. Trouble is, it’s awfully hard work. You can now see why people had so few clothes in the past.
.

E.  SOAP MAKING
eAudrey’s Luxuriant Soap and Crafts
<http://www.eaudrey.com/>

 1.  Rendering Tallow
•   3-5 lbs. suet or other meat fat
•   water
•   2-4 Tbls. salt
•   sharp knife
•    large pot
•   long handled wooden spoon
•   safety goggles
•   rubber gloves
•   wood or stainless ladle
•   colander
•   primary mold

Procedure
__1)  Cut or grind the suet into the smallest pieces possible. This will make it melt more easily.
__2)  Place ground suet into a pot. Make sure there is room for expansion as it heats.
__3)  Add 3 inches of water to pot. At this point, add the salt.
__4)  Set mixture over medium high heat and put on safety gear.
__5)  Stir mixture as it heats. Melt the suet into as much liquid as possible.
__6)  Allow a slow boil only. Mash the small pieces with the spoon. This could take up to two hours, depending on how much fat and how small the pieces.
__7)  Once the suet is liquefied, remove from heat. Pour or ladle it into a sieve or colander to remove any meat, sinew, or gristle. Mix the strained solids with peanut butter and put out for the birds.
__8)  Fill your primary mold with the strained mixture and refrigerate overnight.
__9)  Remove mold from fridge and turn upside down in the sink. Allow any extra water to drain away.
__10)  You now have a block of tallow. Refrigerate or freeze until you are ready to make a batch of basic soap.

2.  Basic Soap Instructions
<http://www.eaudrey.com/basic.htm>
__1)   Read directions for recipe to make sure you have the required ingredients and gear.
__2)  Use safety gloves and goggles or eyeglasses.
 __3)  Weigh the required amount of water (distilled is best) into one of the pitchers. To do this place an empty pitcher on the scale and set to zero. Now measure the amount of water.
__4)  Using the same method as above weigh the lye needed in the second pitcher.
__5)  Carefully pour the lye into the pitcher containing the water. You must avoid splashing-this is the most dangerous step! Never add the water to the lye.
__6)  Stir solution gently with a wooden spoon until dissolved. Make sure you have sufficient ventilation. Resist the temptation to lean over the pitcher to get a good look. You do not want to breathe anywhere near this container.
__7)  While the lye is cooling, melt the fats. The temperature of both must eventually be brought to 100 degrees simultaneously. If the lye solution cools too much, put the pitcher in a pan or bowl of hot water.
__8)  Double-check the temperatures of the lye and fat solutions to be sure they are 100-110 degrees (equal temperature is desired).
__9)  While stirring the fats, pour the lye solution into the melted fat/oil in a thin stream. Stir continuously to ensure the lye mixes into the fat.
__10)  Continue stirring in a carefully manner to avoid splashing. The mixture should start thickening. You will eventually see “trailings” or lines on the surface. This could take 20 minutes to an hour, usually closer to one hour. Be careful using hand mixers as they can speed things up too much.
 __11)  Pour this liquid soap into your large plastic container mold. Put the lid on and wrap with the towel.
__12)  Put the wrapped mold in a warm place and allow to set for 48 hours.
__13)  After 48 hours, unwrap the mold. The soap should still be warm. If the surface is still very soft leave lid off for a day. If soap looks abnormal refer to Troubleshooting or keyboard shortcut Alt-t. When it is as firm it is ready to be removed from the mold.
__14)  Remove soap from mold. To do this, first pull the plastic mold away from the soap on all sides. Then, turn the mold over onto the needle point screen or plastic. If it doesn’t fall out of the mold, push down on the upside down mold and it should pop out. You should have a nice clean block of soap ready to be cut into bars.
__15)  First, score the surface where the cuts will be made. Then, warm the knife to be used in water. Dry the knife and cut the block into bars of soap.
__16)  The hand cut bars still need to cure. They will become lighter in weight and slightly smaller. Place them on the plastic needlepoint screen for about three weeks.
Check your local hardware store – Depending on the regulations where you live, some hardware stores may sell 100% sodium hydroxide as a drain cleaner, or ‘Red Devil’ Lye drain cleaner.
Discontinued mfg. Amazon.com, 1 lb, ~$11.00 inc S&H. Amazon.com, 1 lb, $10.09 inc S&H. Amazon.com, 2 lbs, $19.95 inc S&H.

Leave a comment

Filed under Survival Manual, __4. Shelter Issues

Washing dishes (during an emergency)

(Survival Manual/4. Shelter issues/Washing dishes)

A.  How to Wash Dishes in Cold Water
eHow, by Patricia Loofbourrow
<http://www.ehow.com/how_5715569_wash-dishes-cold-water.html#ixzz1HXbvE8aH>
We’re used to hot water, dishwashers and other modern conveniences. But what about when the power goes out? In many area of the Midwest, ice storms cause power outages, sometimes for weeks. Hurricanes in the south or earthquakes in the west can lead to power outages as well.
For those who live in all-electric homes, losing power for more than a few days leaves you with a stack of dirty, greasy dishes to deal with, and unless you’re ready to spend all day heating water, you’ll soon be asking “How do I wash dishes in cold water?”
Here’s how.
An additional benefit to using this method is that it uses minimal water, so if your water supply is low (for example, whatever the disaster is has disrupted water supplies as well) you won’t waste a lot of water on washing dishes.
Be prepared!

Instructions: things you’ll need:
__•  water
__•  dish soap or bar soap
__•  sponge or dishrag
__•  a dish pan
__•  dish drainer (you can also use the rack on your dishwasher for a drainer if need be)

1.  Place dishes in the empty dish pan.
2.  Stacking the dishes neatly in the dish pan will help you get as many in as you can. Keep sharp items (like sharp knives) out of the dishpan; place these on the counter and wash them separately.
3.  Place a small amount of dish soap on the sponge or dishrag (between a dime and a nickel sized spot). If using bar soap, rub the damp bar with the sponge or dishrag a couple of times.
4.  Pick out silverware and scrub them with the sponge or dishrag one at a time until they are clean (no grease or stuck-on food), laying them on the counter with soap still on them. When you have a good handful of silverware (or you have cleaned all of them), pick up the entire bunch and rinse them under a slow stream of water over the dish pan so the soapy water falls into the dish pan.
5.  When you have rinsed all the soap off the silverware, turn the water off and place the silverware into your dish drainer.
6.  Take the bottom plate from the stack of plates in the dish pan and soap it until it is clean.
7.  Turn on a slow stream of water and rinse the plate, then turn off the water and put the plate in the dish drainer. Repeat step 7 for each plate in the dish pan until either all the plates are clean or the dish pan is full of water.
8.  You may notice that the dishes are easier to clean as you go along, because the soapy water soaks off any stuck-on food as the plates sit in it.
9.   This is called greywater, and is still useful if you need it.
10.  When the dish pan is full of water, take out any remaining plates and put them to the side. Dump the dish pan water into your garden, use to flush your toilet, pour it onto your compost bin, or pour down the sink if there is nowhere you need the water.
Note: Use the next method if hot to b oiling water is available.

.

B.  Washing Dishes in a Camp/Emergency situation. Hot water available.
<http://www.your-camping-guidebook.com/camping-dishwashing.html#ixzz0pSQPdOKN>
Most campers are environmentally conscious and prefer to stick with reusable rather than disposable kitchen items but give in to the throwaways because washing dishes while camping seems like such a daunting or impossible task.
So here is the easy step-by-step camping dishwashing process that we faithfully use to wash dishes when we are camping. We use this method on both our family camping trips as well as our scouting trips where everyone brings a mess kit and there are no throwaway plates, cups, or utensils used.

What Equipment Do You Need?
When setting up our camping dishwashing station, first we start with the equipment list. We keep all of things packed in our kitchen box…except for the water, the dirty dishes, and the human of course!
__•  Paper Towels
__•  Your Favorite Dish soap
__•  A Dishcloth/Sponge & Scrubby
__•  Tongs
__•  Three Dish pans
__•  Hot Water
__•  Cool Water
__•  A splash of bleach or sanitizing tablets (optional)
__•  Dirty Dishes

Step 1:  Heat The Water
Immediately after dinner is ready, we put two or three pots of water to boil on the stove while we are eating. Actually, we put two…and then do the third one afterwards because that is what works for us with the equipment we have. One pot will be in the largest cooking pot we have, for the other we use our coffeepot.

Step 2: Wipe The Plates
After dinner…and this is the only place we use disposable paper good item…everyone takes a paper towel and wipes their plate and silverware clean of any food particles. This can be done with one paper towel and it is an important step to help to keep the food particles out of the washtub. We put the paper towels in the fire ring to be burned later during our campfire.

Step 3: Set Up The Wash Tubs
Now it is time to get the three tubs out. You can work from left to right, or right to left, whichever works best for you.
I will call them A, B, and C to make it easy to follow along with the directions. I usually fill the tubs only halfway or a little more…not to the top.
These are just cheap ordinary rectangular dish tubs you can get at Wal-Mart. They easily nest inside each other and you can put a bunch of your kitchen stuff inside the top one for storage.

Step 4: Prepare the tubs
•  Tub A is for washing. We put a few squirts of dish soap in here, then fill the tub halfway with regular water. You should be using an environmentally safe, biodegradable soap such as Campsuds or one of the Dr. Bronner’s natural soaps. When the hot water is ready, we add some to warm this tub up. This is a personal preference. I like the water to be warm when I am washing the dishes while my husband likes cool water (which feels yucky to me!).
•  Tub B is the rinsing tub and gets just plain water in it. We fill the tub 1/3 of the way with cool water, and the rest (about 2/3) with hot water.
•  Tub C is for sterilization. This is a very important part of your camping dishwashing station…don’t skip it!!! Some people like to use sterilization tablets, some put a few drops of bleach in the tub (health safety standards recommend 1 teaspoon of bleach for every 2 gallons of water)…but we use only pure boiling hot water. This is extremely hot and you will need tongs to pull the dishes out of this tub.

Step 5: The Washing Process
•  Using a paper towel, thoroughly wipe any food residue off of the plates. You want as little food as possible to be in the tub when washing. One paper towel is good for wiping several plates.
•  Start with the cleanest dishes first, leaving the dirtiest dishes, usually the pots and pans and mixing bowls, for last.
•  The first dishes to be washed will be placed in Tub A with the soapy water and dishcloth or sponge, just like you do in a sink.
•  After washing, the dishes come out of Tub A and into Tub B where you agitate a little to rinse off the soap.
•  Now the dishes get moved from Tub B, the rinsing tub, to Tub C, sterilization. Be careful when you put the dishes in so you don’t splash the hot water on yourself!
•  Let the dishes sit a few minutes in the boiling water (Tub C) while you go back to Tub A and wash some more dirty dishes….put these washed dishes in Tub B to rinse, and while they are in there, with the tongs take the clean, sterilized dishes out of Tub C.
•  Spread some paper towels, or use a portable dish drainer if you like, and let them drip dry upside down (we do spread out paper towels for this which we reuse all weekend)

And that is it! Now in writing this, it sounds like a complicated procedure, partly because I really broke down the steps into baby steps to make sure I was explaining it well. But really, camping dishwashing is very simple and easy to do. Your dishes are done in no time at all…and with a lot less water than you use at home!

6.  Dumping The Water
Now it is time to clean up the camping dishwashing area! The method that we use to dispose of the dishwater also sounds a little complicated….but it is not at all…and it is done this way to wash out and clean up your dish tubs without using any more water than you already used for the dishes!
•  First dump out the water in Tub A. This was the washing water with the soap…and will be the dirtiest of the three tubs (See the ‘minimal impact’ method of dumping your water, discussed in the next section.)
•  Now…dump the rinse water from Tub B into the empty Tub A (this gives Tub A a rinse with cleaner water that you already have).
•  Now…dump the boiling water (it won’t be boiling hot anymore) from Tub C into Tub B. So now Tub C is empty and clean and you are done with it. Turn it upside down with your other clean dishes to dry.
•  So now you have water in only Tub A and Tub B. Go ahead and dump the water from Tub A again.
•  Now pour the hot water from Tub B into Tub A so Tub B is clean and empty, and Tub A is getting its final rinse with the batch of hot rinse water. Put Tub B upside down with the clean dishes to dry.
•  Finally, dispose of the water in Tub A and turn it over to dry…and you are done! And your dishes are done too!

This is the method I learned 12 years ago when I was a Cub Scout mom and leader….and we have used it on every family campout and Boy Scout training and troop campout I have been on. We always set up a three-tub camping dishwashing station…and the dishes come out clean and, most importantly, sanitary.

.

C.  Some Rules For Your Camp/Emergency Dishwashing Station
As campers we love nature and its beauty and try to do the best we can to promote Leave No Trace camping, or camping that does as little damage as possible to the environment.
There are many debates as to whether soapy camping dishwashing, is more harmful to the environment than using paper and plastic disposables.
All of the research I have done points to camping dishwashing with reusable plates, pots, silverware, and cups, as being the preferred method…but here are some important steps you should take when washing your dishes at your campsite to make sure you protect the area so many can enjoy it in the future as well.
__•  If possible, use small quantities of biodegradable soap.
__•  Make sure you wash and dispose of the waste water at least 100 feet from any water source. Never pour it into a river or lake, or any water source as this will contaminate the water!
__•  If possible, dig a small hole to pour the water into, to allow the ground to filter the water and return it back to the water source in its own natural way. If you can’t dig a hole, spread it over the ground to encourage natural filtration.

During campouts, I have seen people washing their dishes/pots/pans under a running spigot on their site. This is not an acceptable practice of camping dishwashing for several reasons. First, the running water is a huge waste of excess water! Second, the water is not being dispersed of properly to encourage natural filtration.
Using the ‘three-pan method’ for camping dishwashing takes a few extra steps than using a running spigot, but it is proper camping technique, sanitary for the environment…and for you, your family, and our dishes!
.

D.  How to Use Clorox Bleach in Water Treatments
November 19, 2010, eHow.com, by Cricket Webber
<http://www.ehow.com/how_7366404_use-clorox-bleach-water-treatments.html#ixzz1HXdgkCLL>
In an emergency, purified water is essential.
The most thorough way to purify water is to boil it, but in an emergency this is not always possible. If you have no way to boil contaminated water, you can use Clorox bleach instead. Bleach is an inexpensive and highly effective disinfectant. You can use bleach to clean all sorts of surfaces, and it is used to keep laundry disinfected and clean. Common household bleach breaks down to salt and water after it has performed its disinfecting task. Never drink undiluted bleach, but you can use it to safely purify water in an emergency situation. The purified water can be used for drinking, cooking or washing dishes.
Procedure:
1.  Pour the water you want to purify into a clean container. If the water has a cloudy appearance, filter it before adding it to the clean container. Use a coffee filter or a paper towel to filter particles out of the water.
2.  Add Clorox bleach to the water with an eyedropper. To purify 1 qt. of water, add 3 drops of bleach. For 1/2 gallon of water, add 5 drops of bleach, and for 1 gallon of water, add 1/8 tsp. of bleach. If the water is cloudy or cold, increase the amount of bleach to 5 drops for 1 qt., 10 drops for 1/2 gallon, and 1/4 tsp. for 1 gallon.
3.  Dish rinsing:  a) If using hot water to rinse to disinfect dishes and utensils, add 1/8 tsp bleach per gallon water. b) If using a cold water rinse, add  ¼ tsp bleach per gallon water.
Mix the bleach thoroughly into the water.
4.  Let the bleach and water sit for at least 30 minutes before you use it. If the water is cold or cloudy, allow the water to sit for at least 60 minutes. The purified water should smell faintly of bleach when the reaction is complete.
.

E.  How to Prevent Food Borne Illness by Cleaning Your Kitchen
eHow.com, by Amanda C. Strosahl< http://www.ehow.com/how_5069352_prevent-borne-illness-cleaning-kitchen.html#ixzz1Q0ankTIP>
[I have adapted this article to the emergency kitchen-Mr Larry]

More than 200 known diseases are transmitted through food. In the United States alone, an estimated 6 million to 81 million illnesses and up 9,000 deaths are caused by food borne diseases each year.
Keeping your emergency kitchen clean is a simple, yet effective way, of preventing food borne illness. Here are some easy steps you can take to make your kitchen a safe area.
1. It is easier to clean an emergency kitchen or camp table work  surface when you do not have to fight your way through it. Store pots/pans and dining accessories in cupboards, cabinets or boxes.  Keeping the extra surfaces to a minimum will provide less breeding ground for bacteria.
2. Clean out your refrigerator-ice chest on a regular basis. Discard any food that shows signs of spoilage. Wipe down the shelves and door using warm, soapy water or cleaning spray. It is safe to use dish detergent in your water when cleaning your refrigerator, but avoid using a variety that has a strong fragrance.
3. Clean up any spills on your stove top each time you cook. Use warm, soapy water or a kitchen cleaner. If you have used a camp oven, wipe the surfaces and racks after the interior has cooled. It is easier to remove drips and grease from the oven as they happen.
4. The work surfaces are the most dangerous areas in the emergency kitchen. Food, utensils and hands come directly in contact with these surfaces several times per day. Wipe down the work areas of your countertops or work top table before and after using them. Use hot, soapy water or a kitchen cleaning spray. Remove everything from the work surfaces and wash the entire surface once per week. An effective sanitizing solution for thoroughly cleaning the kitchen counters is to mix one capful of bleach into a quart of warm water. Allow the counters to air dry.
5. Wash dishes as soon as you can after using them. Do not let dirty dishes sit out on the counter. Bacteria and mold grows quickly on dirty dishes, especially in warm temperatures. Dirty dishes attract flies and other insects, as well as rodents. Wash dishes by hand using the procedures discussed above each time you prepare a meal.
6. Change your dish towel and dish washcloth daily. Bacteria can survive for weeks in a wet dishcloth or sponge. It is important to change your dishcloth, dishtowels and sponges on a daily basis. Use one dishcloth or sponge for cleaning the counters and another for washing the dishes. Use disposable paper towels when cleaning up spilled fluids from raw meat. If you plan to use a single dishcloth throughout the day, let it soak in a little water that has had a couple drops of bleach added to it between uses.

Leave a comment

Filed under Survival Manual, __4. Shelter Issues

Utility Cargo Trailer

(Survival manual/4. Shelter issues/Utility trailer)

1.   The Bug Out Trailer
5 Aug 2009, TheSurvivalistBlog.net, by M.D. Creekmore
Part 1 pasted from <http://www.thesurvivalistblog.net/beyond-bug-out-bag-ultimate-grad-and-go/ >
“I’m not a fan of the bug out bag survival strategy. Too many things can go wrong and probably will. Remember Murphy’s Law which states “Anything that can go wrong, will go wrong.” no matter how hard we try or the plans we make, old man Murphy will be there.

It Ain’t Easy
Hiding and surviving in the wild can be done, but your life will be miserable at best. No matter what the “experts” tell you living off the land – under primitive conditions, isn’t easy.
Even the North American Indians often suffered from starvation and malnutrition. And they were born to the life – what makes you think you will fare better?
Heading for the hills or bugging out is at best a temporary solution. A means of getting to safety until a permanent solution can be implemented. It’s a plan of last resort – when you have no other choice, but to flee or die.

The Bug Out Trailer
A better plan is the bug out trailer. This is a small trailer that can be towed by a vehicle into the back country or other location. Any trailer will work as long as the tow vehicle has enough power to pull it to where you want to go.

The bug out trailer has the advantage that it can be dropped and hidden, leaving your vehicle free for other things and also the ability to carry much more than you could on your back .

Hiding The Trailer
Dark natural colors are best – green, brown, tan and black work well depending on terrain. Avoid camo patterns as this will only attract attention. You can always cover it with camo netting and natural cover found at the drop off location.

Storage Once you have equipped the trailer with the needed supplies, you need to find a safe place to store it until needed. If you are in a rural area it’s a simple matter to hide it in a corner of your garage or under a shed. If you are in the city things can get more complicated.
In this case the only option maybe renting space at a storage facility. Most areas have these, allowing you to store the trailer and supplies at or near your intended bug out location.
This way you don’t even need to pull it behind during your escape, it’s already there, waiting to be picked up. The downside of course is the rent paid for the storage unit. If you have a friend or relative in the area (that can be trusted) you might be able to store it there, saving the cost of rent.
[At right: Haulmark exterior color palate]

Theft And Other Hassles
To discourage theft, trailers with enclosed sides, roof and lockable door are best. Removing the wheels and storing them in a separate location will discourage anyone from hooking to the trailer and driving away. You can also chain it to the storage structure.
I’m not going into detail here as what you should store in the bug out trailer – that is another post in and of itself. You know you’ll need food, water, medical supplies, appropriate clothing and protection – cover these areas and you will be off to a good start.
Heading for the hills may not be the best strategy but it beats the crap out doing nothing – just keep a sharp eye for old man Murphy. Rest assured he’ll be waiting… What do you think – Bug out trailer or bug out bag?”
.
 .
2.  Long term, high volume mobile kits
Food supplies in a bug-out utility trailer may include a hundred of pounds of wheat, rice, and beans; enough honey, powdered milk, canned goods, bottled fruit, vitamins, dehydrated fruits and vegetables, salt, pepper, spices, and oil for several months. Several cartons of freeze-dried entrees.
In addition, such kits often contain high-calorie energy bars, a cooking kit, utensils, liquid soap, towels, items to handle your laundry. The water supplies may include bottled water, filtering kit, bottles, collapsible water containers, and chlorine bleach for water purification. Food preparation and washing equipment may include items such as a grain grinder, a bread mixer, a strainer, a manual can opener, a steam canner with canning jars and O-rings, cutlery, knives, an electric 12-volt cooler icebox, kerosene or Coleman lamps and heaters, kerosene or propane stoves, extra fuel, a clothes wringer, and an electric hot plate (which would require an inverter to operate off a car battery).
Medical supplies may include: scissors, tweezers, forceps, disposable scalpels, two thermometers (oral and rectal), inflatable splints, bandages, sutures, adhesive tape, gauze, burn ointment, antibiotic ointment, aspirin, rubbing alcohol, ipecac syrup, sterile water, cotton rags, soap, cotton swabs, a blood pressure gauge and stethoscope.
Transportation items may include bicycles with off-road tires and suspension, emergency tools and spare auto parts (e.g., fuses, fan belts, light bulbs, head light, tire pump, etc.), and an inflatable raft with paddles.

[Image at left: 6 x 12 foot enclosed Utility/Cargo Trailer. Typical storage capacity is about 1830 cu ft, with 700 lbs gross weight. and 1800-2200 lb payload capacity.]

In addition, the kits may contain typical individual “survival kit” items, such as nylon tarps, extra clothes and coats, blankets, sleeping bags, matches (and/or other fire starting equipment), a compass and maps, rechargeable flashlights, toilet paper, soap, a pocket knife and bowie-knife, a fishing kit, a portable camping stove, a power inverter, backpack, paper and pencil, a signaling mirror, flashlight, whistle, cable saw, bleach, insect repellent, magnifying glass, rope and nylon cord, pulleys, and a pistol and ammunition.
Communications equipment may include a multi-band receiver/scanner, a citizens band (CB) radio, portable “walkie-talkies” with rechargeable batteries, and a portable battery-powered television. The power supplies may include a diesel or gasoline generator with a one month fuel supply, an auto battery and charger, extension cord, flashlights, rechargeable batteries (with recharger), an electric multi meter, and a test light.
Defense items include a semi-automatic pistol, rifle, shotgun, ammunition, mace or pepper spray, and a large knife such as a KA-BAR or a bowie-knife.
Tools may include cutting tools such as saws, axes and hatchets; mechanical advantage aids such as a pry bar or FuBar wrecking bar, ropes, pulleys, or a ‘come-a-long” hand-operated winch; construction tools such as pliers, chisels, a hammer, screwdrivers, a hand-operated twist drill, vise grip pliers, glue, boxes of nails, miscellaneous nuts & bolts, screws, wrench set, a nut driver, a tap and die set, a socket set, and a fire extinguisher.
If this is going to be a long-term event, bring Barterable items such as fishing line, liquid soap, insect repellent, light bulbs, can openers, distilled spirits, extra fuels, motor oil, and common ammunition in .22LR and 12 gauge.

 .
 3
.  Example units [the sales information was  copied from their website]
_A.  United U-Series – Cargo Trailers
United U-Series Cargo Trailers like all United Trailers come with five-year limited warranty backed by three generations of manufacturing experience, superior materials and durable designs. Unique features include the rear corner posts and header which are made of 12 gauge steel to provide the ramp door with a solid framework. You can also customize your United U-Series Cargo Trailer in many ways and choose from different floor plans, nose shapes, and colors. 6′ x 12′ United Wedge Nose double doors, side door, stone guard, roof vent, dome lights. Regular Price…$3,399.

_B.  Wells Cargo Road Force Cargo Trailers
Road Force Cargo Trailers are the mid-range trailer in the Wells Cargo arsenal. Road Force Cargo Trailers offer both rugged durability and exceptional value in there line of 5′, 6′, 7′ and 8′ wide cargo trailers. Road force even offers you ten reasons why it is the clear leader of its trailer class. The Road Force 5′ Wide Travel Trailer for instance it easy to maneuver, load, and safely tow behind almost any vehicle and offers an optional V-Front which provides an additional 28″ of room not to mention a more aerodynamic design. Pick from ten colors and a wide variety of options and packages for a total customized look. Wells Cargo.

_C Haulmark Grizzly Cub DT2 Cargo Trailer 2009
http://www.haulmark.com/bumper-pull_cargo-trailer/cub-5and6wide/
A bear of a cargo trailer, the Haulmark Grizzly Cub DT2 2009 is in no way cute and cuddly – it takes its hauling responsibilities seriously. Available in 6 ft-wide in various lengths, the Grizzly Cub DT2 is ideal for your general cargo needs. Built with steel framing, TorFlex Axles, 3/4″ plywood flooring, 3/8″ plywood interior wall liners, heavy-duty hinges, side doors optional and structural gauge steel frames, this Haulmark cargo trailer goes the distance – and then some – whether you’re headed to work or headed to the cottage. Haulmark Trailers.
.

4.  A privately owned Bug Out/Camping/Utility trailer
[Image from the internet, described as a 7 ft wide x 12 ft long enclosed utility trailer loaded with gear.]

.

5.  Haulmark ‘Escape Camping package’

[Image above left: Haulmark Escape Camping Package Available on 7′ and 8′ Wide Trailers. Package shown   with optional bunk windows and chrome corners. Image above right: 4.3 cu. ft. refrigerator with microwave oven and closet shown with optional raised   panel doors.]
[Image above left: Camper   package shown with pedestal table and fold up bunks, plus the above options.  Image above right:
Standard   bathroom package with shower and toilet.]
.

Package Contents
• White Ceiling Liner
• Grey Vinyl Walls
• Non-Absorbent   Flooring
• Insulated Walls and   Ceiling
• 2-Roof Vents
• 8-Heavy Duty D-Rings
• 2-Pingle Wheel   Chocks
• Stoneguard
• 12v Tongue Jack
• 1-Roof Vent Framed   and Wired for AC
• 3-Domes and a Switch
• RV Door with Screen
• 1-15″ x   30″ Window with Screen in Kitchenette
• Two Fold Down Bunks
• Pedestal Table
• 1-TV Bracket Wired   for 110V & 12V Antenna
• Oak Cabinet Package   with Closet
• Fresh Water System   with Holding Tanks 18 gal.
• 1-6 Gallon Water   Heater

Package Contents Cont.
• Sink & Vanity
• Shower with 18 Gallon Grey Water Tank
• Toilet with 10 Gallon Black Water Tank
• Microwave oven
• 1-4.3 cu. ft. Refrigerator
• 1-30 amp Panel with Motor Base and Power Converter
• 1-Exterior GFI Outlet
• 1-4′ Fluorescent Light with Switch
• 3-110v Interior Outlets
• Carbon monoxide Detector
Ramp Doors not included

LP Gas Option
• 2-20# Tanks
• 1-4.5 cu. ft. 2 way refrigerator
• 1-LP Gas Furnance
• 1-6 Gallon LP Water Heater
• 1-LP Gas Detector
• 2-Burner Cook-top

Look for Escape unit price in $16,000 range for the 16 foot trailer.

Remember, a 6 ft or 7 ft wide by 12 ft long enclosed Utility Cargo Trailer with out the optional camping package, costs $3,400, and most likely – less.

Leave a comment

Filed under Survival Manual, __4. Shelter Issues

Tarp and tent

(Survival manual/4. Shelter issues/Tarp and tent)

Emergency camp shelter options:

Eureka Sunrise 11 tent

The Eureka Sunrise 11 foot x 11 foot tent can sleep 5 – 6 , or more preferably, 2-3 comfortably, with gear.
The Eureka Sunrise has durable polyester taffeta construction and a ‘StormShield’ polyester fly to lock out the rain and morning dew. When the weather heats up, you have Eureka’s top-quality ventilation system to keep fresh, cool air circulating through the tent.
Durable, 2-pole fiberglass frame, clips with pin / rod pocket assembly for quick set up; 1 door with high / low vents on top and bottom to aid air circulation; 2 mesh roof vents; 4 large, zippered windows allow the option of excellent visibility or privacy;
Includes hanging tiered storage shelf and 2 built-in water bottle holders; No-see-um mesh lining over doors keeps bugs out; Durable polyester construction and a weatherproof StormShield; Measures 11 x 11 x 7’ and weighs 23 lbs., 15 oz. Packed size: 8” x 30”.

For a properly set up emergency tent/ tarp camp, you’ll need: 1) sleeping tent(s), 2) a cooking and eating area covered by a tarp or screened enclosure to protect from the elements, 3) supply- equipment tent, and 4) a covered outhouse-bathing privacy enclosure with porta pottie.

The image above left, is a common, modern camp gear, toilet/shower privacy enclosure. In a really bad situation, few things will provide your accustomed comfort as the personal privacy of an emergency bathroom’.  Remember to have a good quality porta-pottie, some bowl deodorant, Clorox, hand sanitizer, hand soap and lots of toilet paper on hand. TP can become a barterable item.

If you want to make your unwelcome experience as stress free and as home like as possible, I recommend having a screened kitchen and Cabela’s Standard Camp Kitchen with two ‘pantries’ , or equivalent.

 Tarp configurations:
The images below give a visual que to what can be done with a single large tarp. Two tarps can be tied together at the grommets to make a wider or longer tent, or flooring on damp soil. Tarps are also available in orange, green, brown and camouflage
Use a large one ie., 12 foot x 16 foot for an emergency shelter. I mosquito country, provide a ‘roomy ‘two person’ mosquito bed net for each person, you’ll be glad for the extra space.


2 Comments

Filed under __4. Shelter Issues